
Archive for the ‘5 Ingredients or Less’ Category
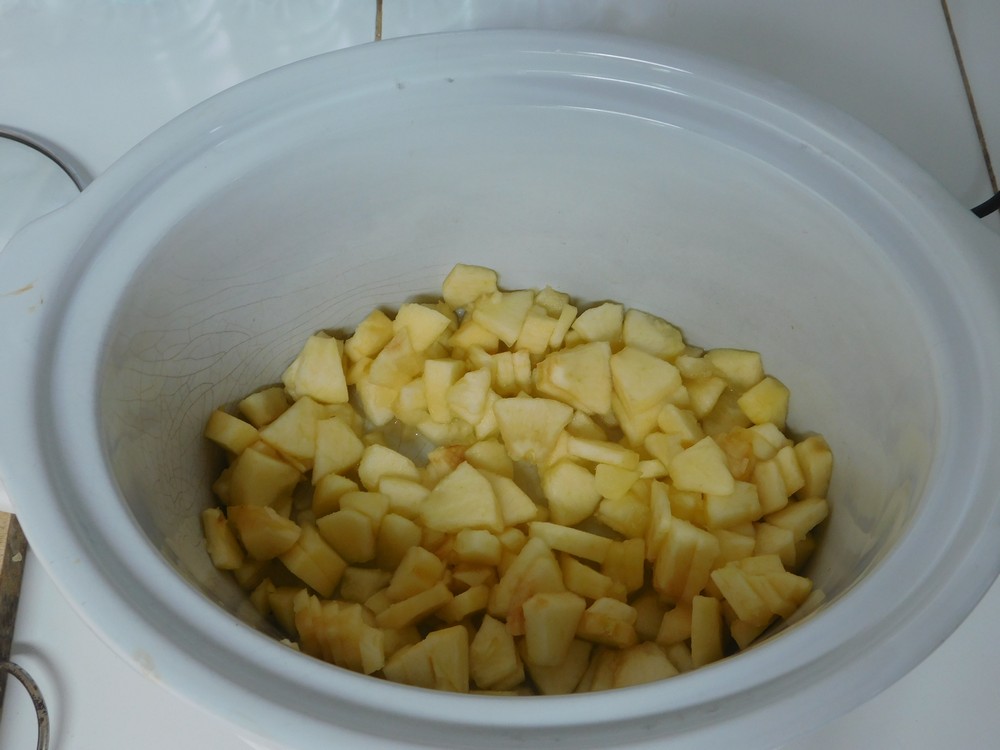
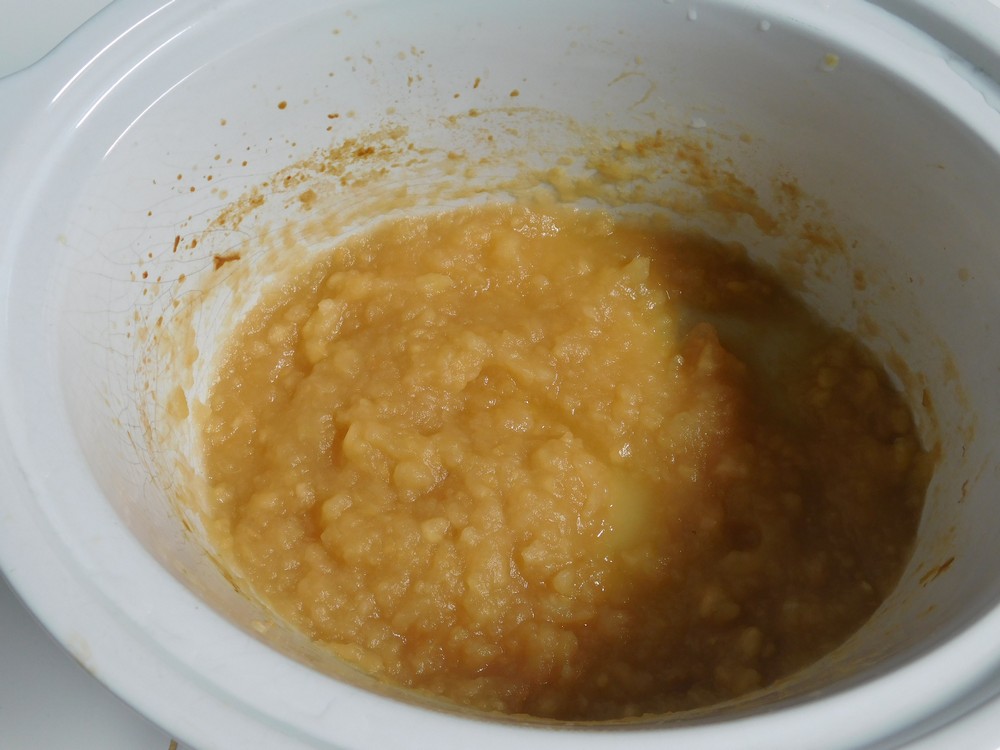
Basic Applesauce (Slow Cooker)
I have never made applesauce before so I researched and found this, basically peeled, cored, and sliced apples and cooked with a bit of water, and if desired, sugar and salt as well. I made this on 14 Dec 2017, and wow is this better than from a jar! I have changed this up to a slow cooker recipe, which is perfect for the controlled heat.
Equipment
- Slow Cooker
- Potato Masher
Ingredients
- 6 medium apples
- ½ cup water
- pinch salt, small pinch
- ½ cup sugar, optional, not really needed
Instructions
- Add the water and a pinch of salt to your slow cooker and set to High setting.
- Peel, core, cut the apples in quarters, and slice. Put the apple slices in the slow cooker.

- Cover and cook until the apples are soft. Stir about every 15 minutes, after 30 to 45 minutes, mash with a potato masher. Add sugar if desired depending on how sweet you would like this. Cook to melt the sugar in and cook down to a sauce.

- Cook for another 30 minutes on Low setting, and you have the best tasting applesauce ever. Serve as a dessert or use as an ingredient in baking.

Notes
Used in Recipes Listed on this Site:
- Pig Pickin' Cake, made it, GO-TO recipe.
- Red Hot Applesauce Jello, made it.
- Applesauce Cookies, made it, GO-TO recipe.
- Applesauce Pie, made it, GO-TO recipe.
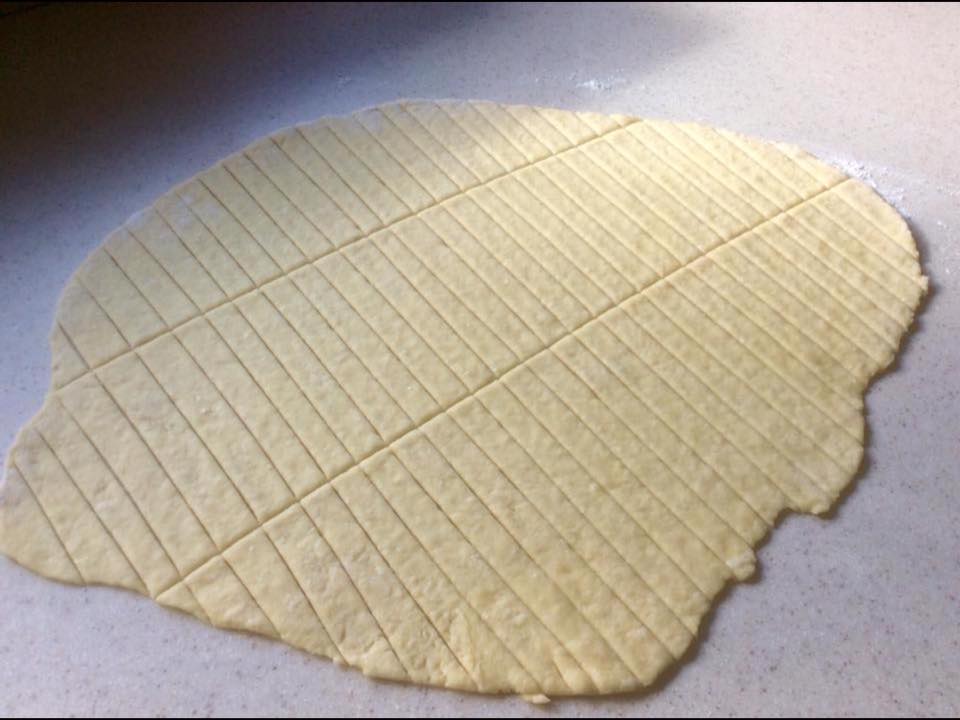
Homemade Noodles II
This recipe comes from a good friend, and is another way to make fresh noodles, highly recommended! I will be making these soon and may very well be another item I do not need to go to the city for. On my to make list soon!
Ingredients
- 1 cup all purpose flour, 128 grams or 4.5 ounces
- 2 tablespoons milk
- 1 egg
- 1/2 teaspoon salt
- 1/2 teaspoon baking powder
Instructions
- In a small bowl, add the egg, milk, and salt. and whisk together.
- In a mixing bowl, mix together the flour and baking powder, add the egg mixture and mix to form into a ball.
- Turn out to a lightly floured surface and knead for about 3 minutes. No worries about over kneading. Let the dough rest for a few minutes.
- Roll out the dough on a floured surface as thin as you like then cut with a pizza or pasta cutter to widths you desire.

- Hang to air dry or cook in boiling water for 10 minutes. If making thicker noodles, you may need to cook a minute or more two.
- For air dried noodles, once dry, store in an air tight container in the fridge for up to a week or freeze for up to 6 months.
- Use noodles in a soup, casserole, etc.
Notes
Low cost.
Recipe and photo provided courtesy of good friend, Kelly Montana Hawk of Tying One On With Kelly (and apron of course) and the original recipe is here.
United States.
United States.
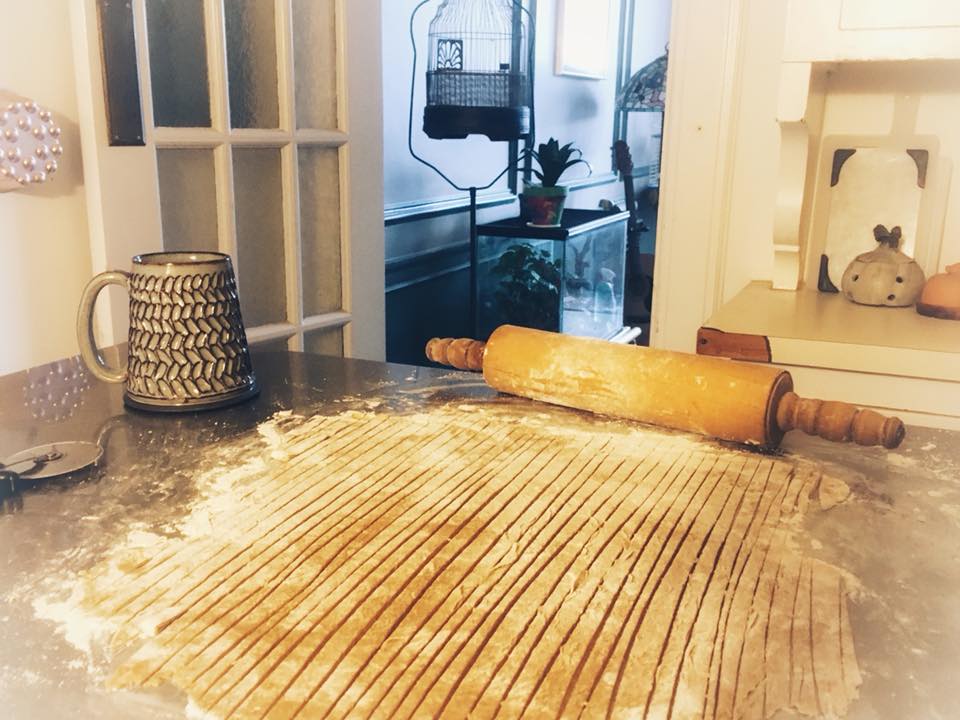
Homemade Noodles I
This recipe comes from a good friend, and is highly recommended! I will be making these soon and may very well be another item I do not need to go to the city for. On my to make list soon!
Ingredients
- 2 cups flour, see Step 1
- 2 tablespoons milk
- 2 eggs
- 2 teaspoons salt
- pinch garlic powder, optional
Instructions
- For the flour, you can use 2 cups all purpose, or 1 cup all purpose and 1 cup whole wheat. If using wheat flour, you may need a bit more milk, And for any recipe with dough, since this is based on humidity where you are, if the dough is too dry, add more milk, if the dough is too sticky, add more flour. If weighing the flour, recommended, 2 cups all purpose flour is 256 grams or 9 ounces.
- In a large mixing bowl, add the eggs, milk, and salt. and whisk together. Add 1 cup of flour and stir until mixture is smooth.
- Mix in the garlic powder and remaining flour, one spoonful at a time until the mixture forms a ball and is no longer sticky.
- Turn out to a lightly floured surface and knead for about 3 minutes. No worries about over kneading. Let the dough rest for a few minutes.
- Roll out the dough on a floured surface as thin as you like then cut with a pizza or pasta cutter to widths you desire.

- Hang to air dry or cook in boiling water for 3-5 minutes. If making thicker noodles, you may need to cook a minute or more two.
- For air dried noodles, once dry, store in an air tight container in the fridge for up to a week or freeze for up to 6 months.
- Use noodles in a soup, casserole, etc.
Notes
Low cost.
Recipe and photo provided courtesy of good friend, Christine Hoffman and the link to her recipe is here.
United States.
United States.
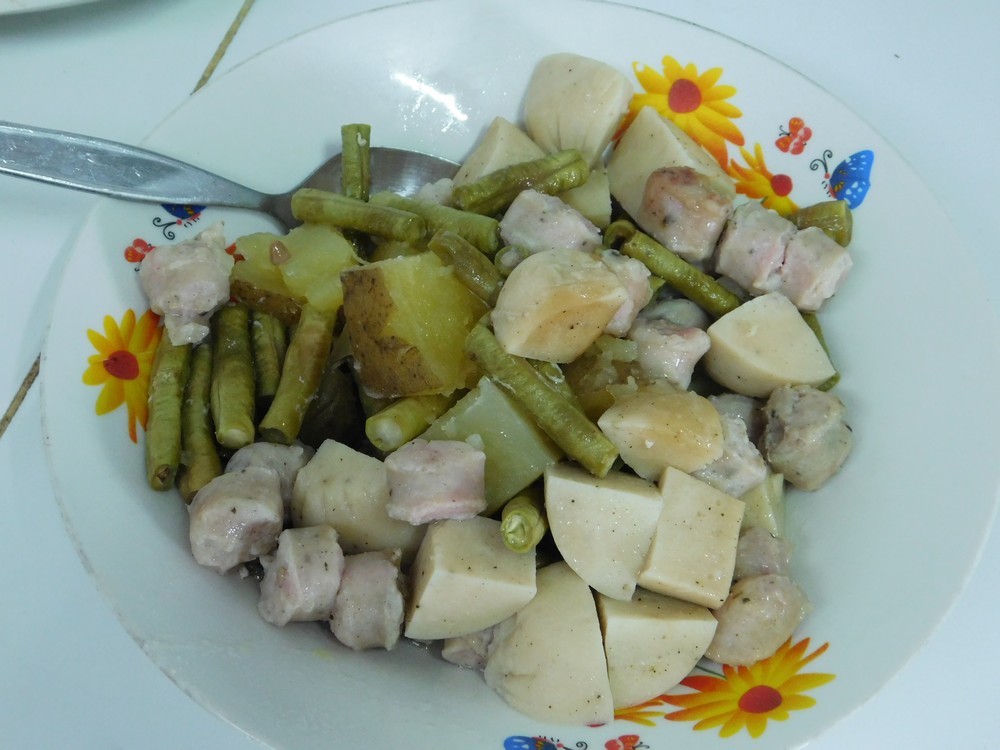
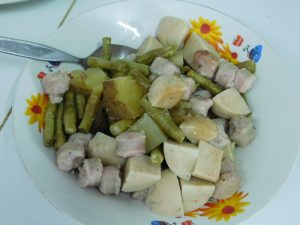
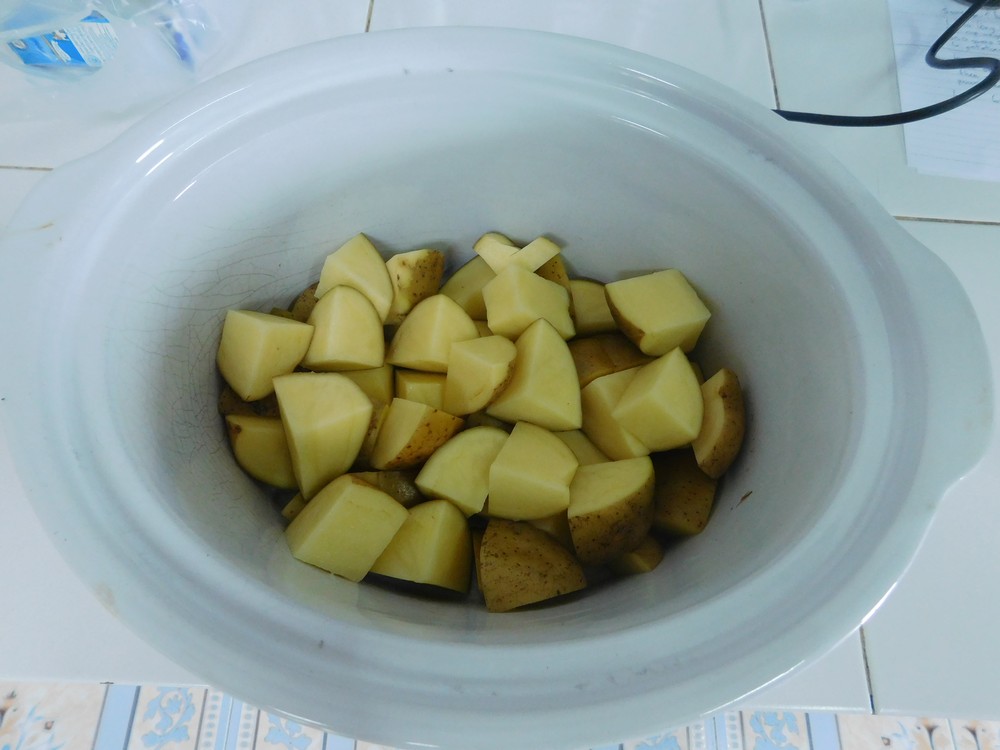
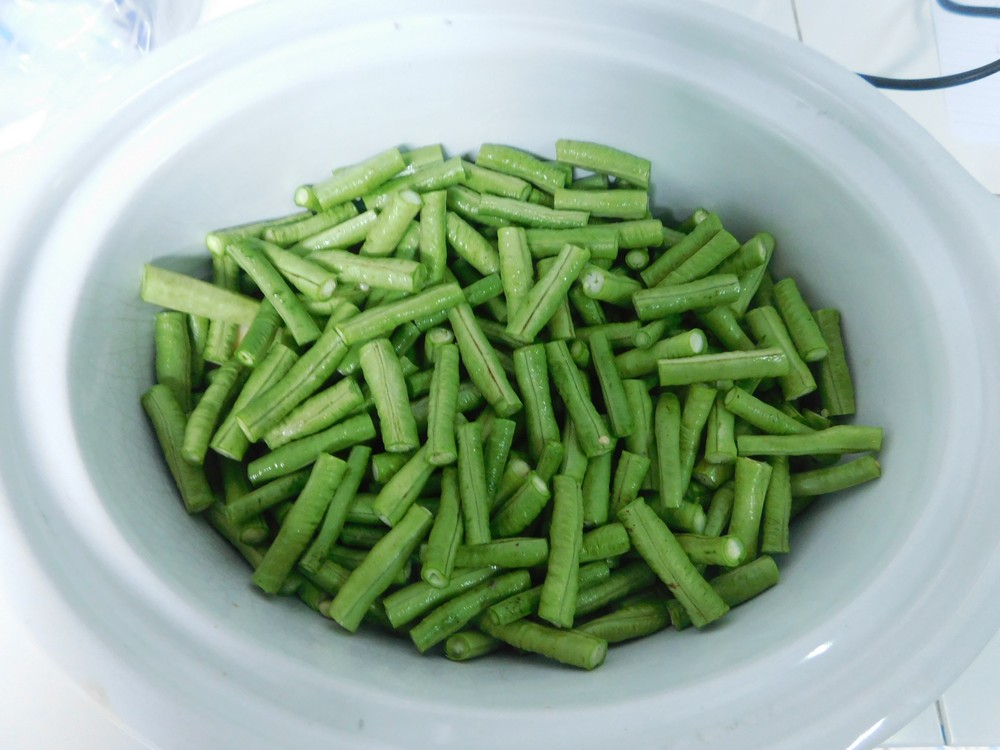
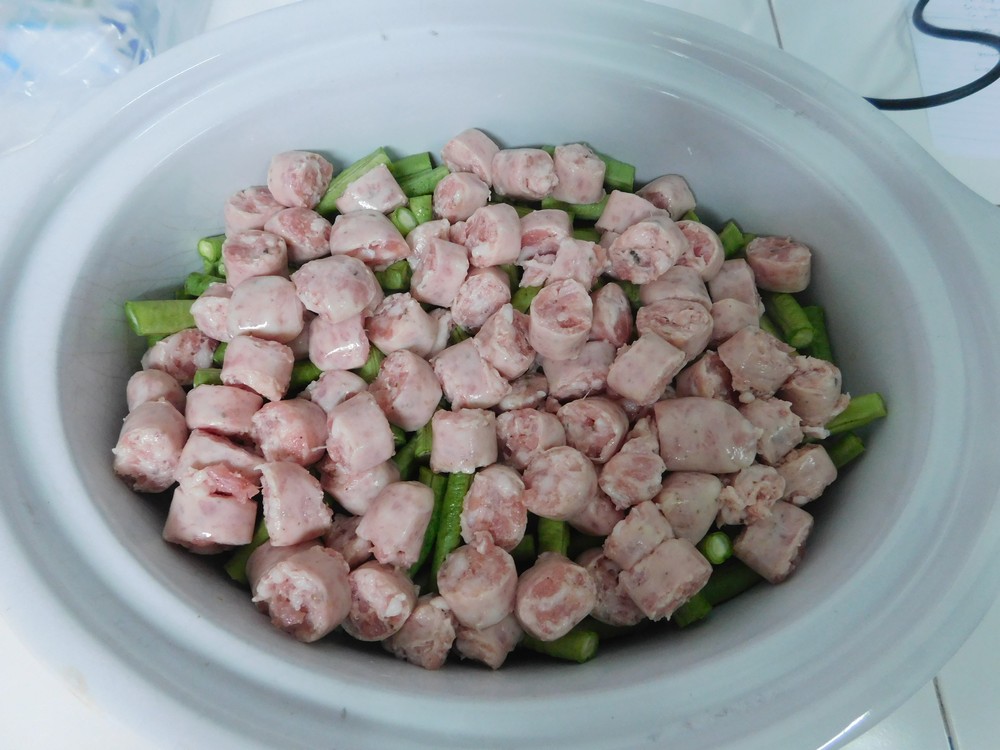
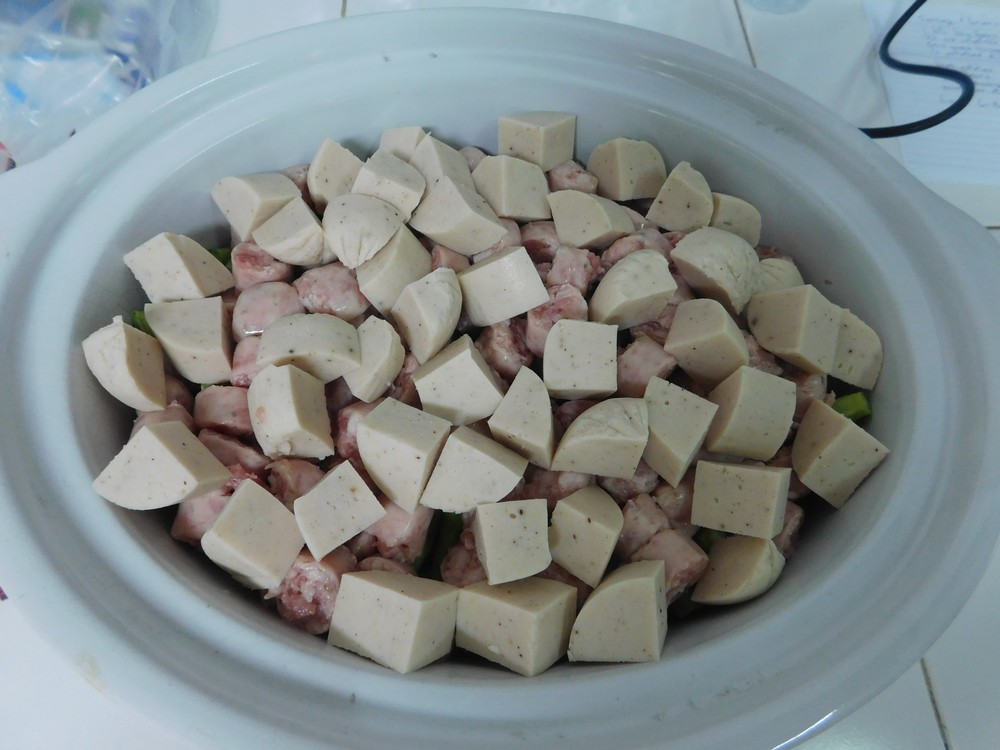
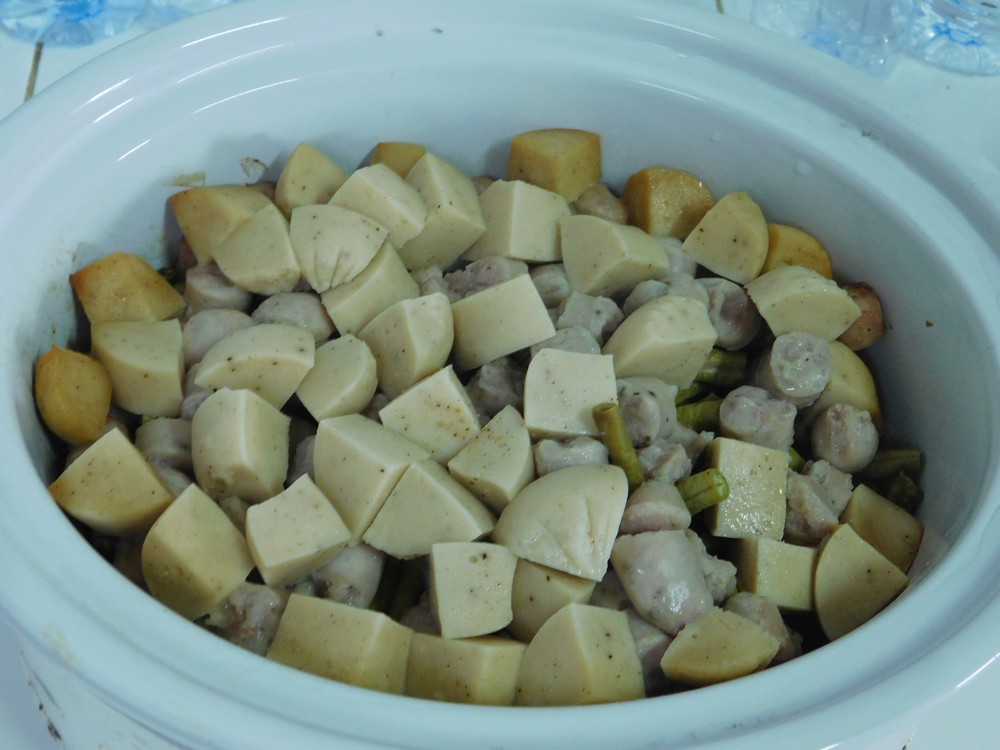
Crockpot Sausage & Green Beans
Sounds delicious. Smoked sausage is available here, but I would lean towards other sausages for the various flavors. Low number of ingredients as well. I made this on 17 Dec 2017, excellent meal!
Ingredients
- 500 grams fresh long beans, cut into 1 to 1 1/2 inch pieces
- 3/4 cup vegetable stock
- 500 grams smoked sausage, cut into 1/2 inch slices
- 6 potatoes, quartered, 8 if really small
Instructions
- Layer the ingredients in the slow cooker starting with the potatoes.

- Then add the long beans.

- Then add the sausage. Pour the broth over the top. For this dish, I used 240 grams of Italian sausage.
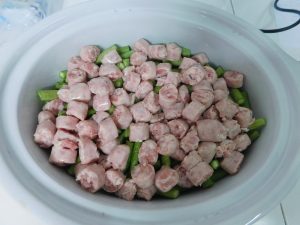
- And another 270 grams of Vietnamese sausage, it is just a recipe, not set in stone, feel free to use sausage of your choice.

- Cover and cook on Low setting for 6 to 8 hours. Do not remove the cover before 6 hours. When the potatoes are fork tender, you can serve after that or switch to Warm to serve later. Add salt and pepper to taste before serving.

- Served with fresh baked bread on the side, perfect meal.
Notes
Going with my purchase of Cumberland sausage at 178 Baht. For 4 servings, this is about $1.31 per serving.
Variants 1. Use other types of sausage, Cumberland would be a good choice, Italian, Bangers, even Vietnamese sausage would be good in this. 2. Use pork or chicken stock in place of the vegetable stock.
Provided by Slow Cooker Kitchen and the link to this recipe is here. You have to scroll down to find this recipe.
United States.
United States.
Pears & Mayo
I heard about this from an old time advertisement for mayonnaise, never heard of anyone actually making this until now. This is a side dish salad. Next time I go to Phuket, I will have to look for a can of pears to test this out with.
Ingredients
- 1 can pear halves
- mayo, as needed
- Cheddar cheese, shredded, as needed
- lettuce leaves, as needed
Instructions
- Make a bed of lettuce leaves on two plates, place two drained pear halves on each plate. Add a generous spoon of mayo into the center of each pear. Top with some shredded cheese.
- Serve as a side dish.
Notes
Low cost.
Variant: 1. In place of pears, use pineapple rings (fresh would be perfect), or canned peach halves.
Provided courtesy of good friends, Wayne Studdard Jr., Millette Hampton, Wanda Gauthreaux.
United States.
United States.
Basic Baked Eggs
Sounds great for a basic baked egg for breakfast, or as I like to do, breakfast for dinner. Only 4 ingredients as well. Looking forward to testing this out.
Ingredients
- 4 eggs, chicken or duck
- 2 tablespoons milk
- salt and pepper, to taste
Instructions
- Heat your oven to 160 C (325 F). Lightly grease with butter, two 10 ounce ramekins or two 10 ounce Pyrex dishes.
- Crack two eggs into each ramekin, spoon milk evenly over the eggs. Sprinkle with salt and pepper as desired to taste. Place ramekins on a baking sheet.
- Bake for 10-12 minutes or until the whites are completely set and the yolks firming up but not hard.
- Serve with toast for a breakfast, lunch, or light dinner.
Notes
Low cost.
Variants: 1. Sprinkle shredded cheese over the top of the eggs instead of milk. 2. Use 6 ounce ramekins or Pyrex dishes and one egg each.
Adapted from an internet recipe.
Baked Eggs & Spinach
Sounds very good and only 4 ingredients, and one of those you can make from a shortcut. Link to the shortcut is listed in the Recipe Notes section.
Ingredients
- 280 grams frozen spinach, thawed, chopped, squeezed dry
- 4 eggs, chicken or duck
- 1/4 cup chunky salsa, OR make from a shortcut
- 1/4 cup Monterey Jack cheese, shredded or Cheddar
Instructions
- Preheat your oven to 160 C (325 F). Grease with butter four 6 ounce ramekins or four 6 ounce Pyrex dishes. I have both 6 and 10 ounce Pyrex dishes so I will try both sizes to verify what is a better size to use.
- Divide the spinach into the ramekins then press an indention in the center with the back of a spoon, about 2 inches in diameter. Place the ramekins on a baking sheet.
- Crack and egg into each depression, top evenly with salsa then cheese.
- Bake until whites are completely set and yolks are firming up but not yet hard, about 20 to 25 minutes depending on the temp of your oven.
- Serve with toast for breakfast, lunch or light dinner.
Notes

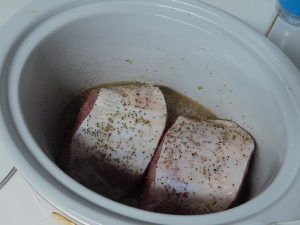
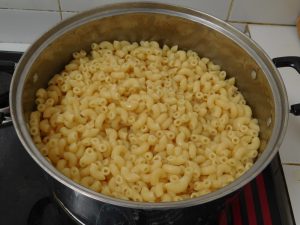
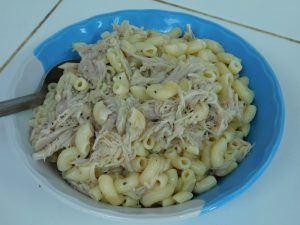
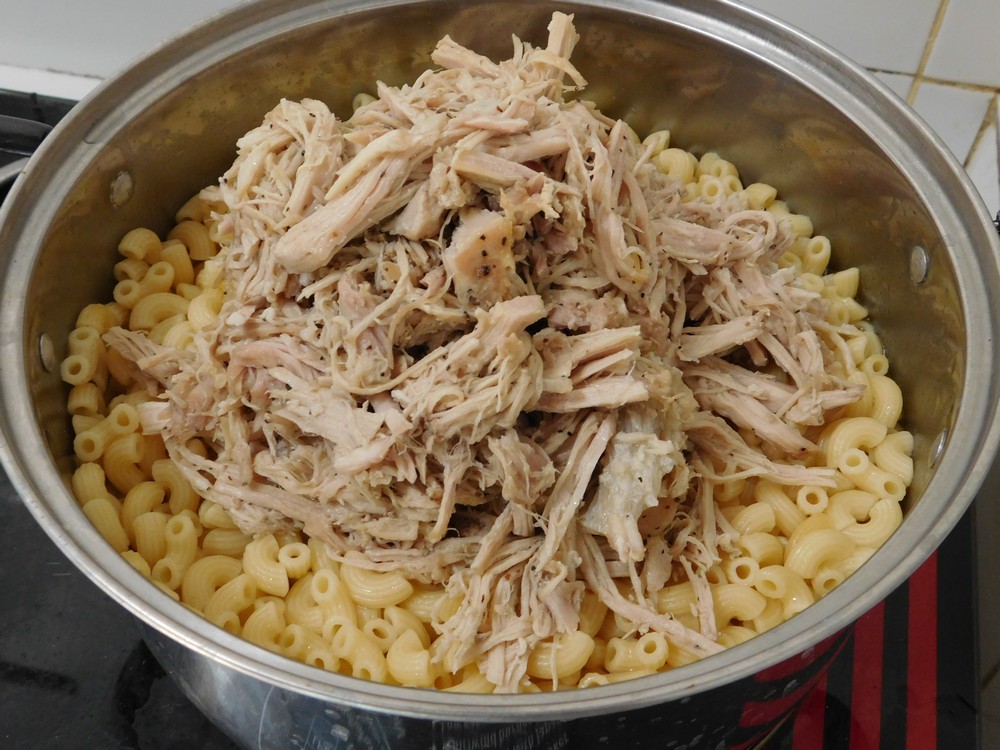
Slow Cooker Pork & Noodles II
Five ingredient recipe, and this not only sounds good and easy, it is! I made this on 8 Feb 2018 and it is great comfort chow. This is a basic slow cooker and stove top recipe.
Ingredients
- 500-1000 grams pork loin, depends on how meaty you want this, (1-2 lbs)
- 3 2/3 cups chicken broth, fresh or from powder
- 500 grams dry egg noodles, or pasta of your choice, (1 lb)
- salt and pepper, to taste
Instructions
- Rub or mist your slow cooker with olive oil to make clean up easier. Not required but is handy.
- Sprinkle the loin well with salt and pepper, be generous. Place the loin in the slow cooker, add 1/2 cup of water and cook on Low setting for 6 to 8 hours, or High setting for 3 to 4 hours. This is two pieces of loin, 1 kilo, I also use these and cut in half for boneless pork chops 🙂
- Check tenderness at 6 and 3 hours respectively, if the pork shreds easily with a fork, it is done. When done, shred with two forks right in the slow cooker, nothing to fine, just good bite sized pieces.
- 20 minutes before you want to serve, place a pot on the stove and add the broth and heat to boiling then add the noodles and cook until just tender. The stock should be mostly absorbed. If there is still liquid, go ahead and drain some of that off.
- Use a slotted spoon and remove the pork from the slow cooker and add to the noodles.

- Stir to combine well. If the pork is not hot enough, heat the pot on very low heat for a few minutes, add a tablespoon or so of liquid from the slow cooker to prevent sticking, this is not a soupy dish. Taste and season as needed with salt and pepper.
- Serve with a salad for a complete meal.

Notes
Going with 1 kilo of pork loin, cost would be 115 Baht, for 6 servings, this is about 56 cents per serving.
Variants: 1. Add cooked cabbage or sauerkraut, add sliced mushrooms. 2. Stir in a cup of chicken gravy (which sounds awesome!).
Adapted from an internet recipe.
Variant 1 provided by good friend, Sheila Olson.
United States.
United States.

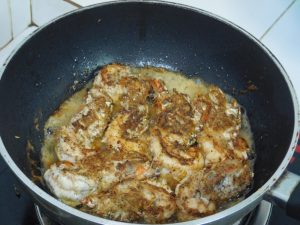
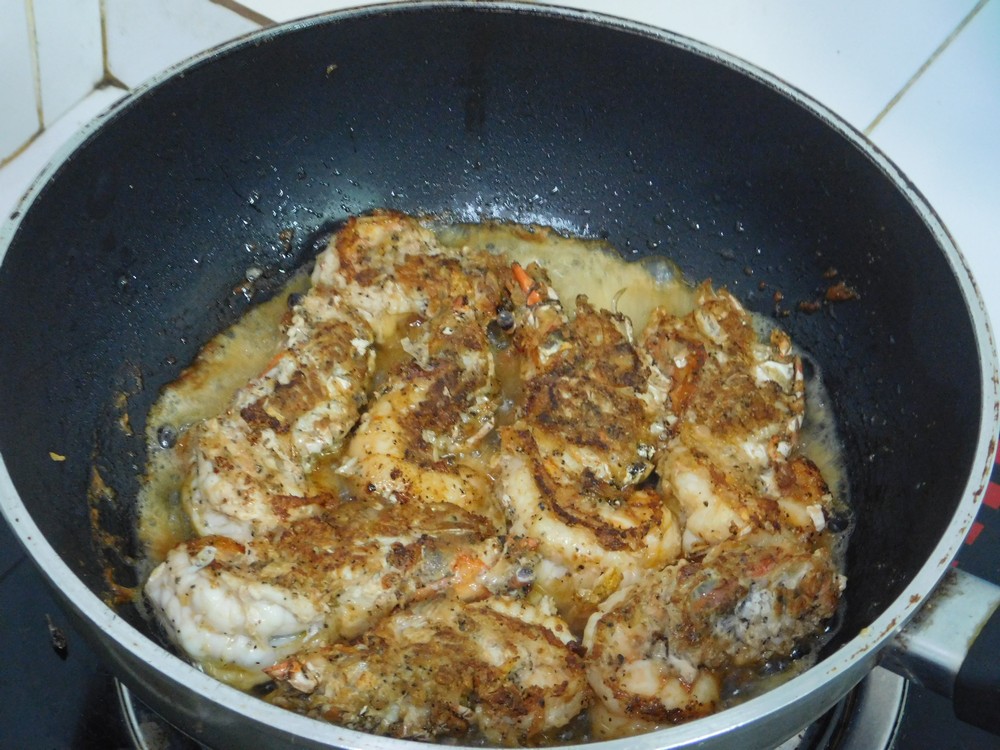
Garlic & Pepper Blue Prawn
Blue prawn are the Giant River Prawn, long front legs with claws, the body has a slight blue tint to it, the legs are a striking blue color, so I typically call these Blue Prawn. These are large and can be prepared is many ways, this is just one way. No quantities given for the prawn, this is a prepare with what you have or want to prepare. This is a typical Thai recipe.
Ingredients
- blue prawn
- black pepper, as needed
- 8 cloves garlic, smashed and peeled, no need to mince
- cooking oil, as needed
Instructions
- This is a Giant River Prawn, aka Blue Prawn. Unlike regular shrimp where you remove the head and eat the tail only, the whole body on these is used minus the legs and shell. Important note, if buying these live, don't get pinched by the claws, quite painful. Normally when buying these they will be dead and on ice.
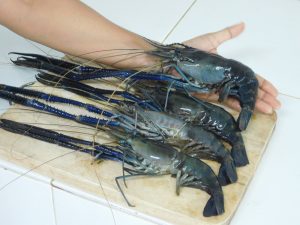
- To prepare the prawn, first thing, remove those two long front legs and discard those. Most important, do not remove the head section, that remains intact with the tail. Then peel the shell off by just splitting between the legs on the bottom with your thumbs, removing the shell from the head and the body, and remove the tail shell as well. Once all the prawn are prepped, rinse in water. Eyes can remain as well as the gills.
- Heat a large pan with a few splashes of oil, when the oil is hot, add the garlic and the prawn in a single layer, if cooking a lot, work in batches. Season well with black pepper, cook for 5 minutes or so or until you start to see the tail meat turning pink and the bottom is getting browned.

- Turn the prawn over and cook for another 2 to 3 minutes or until the nice and golden brown on the bottom.
- Remove from the pan to a platter and serve with rice.

Notes
I bought these from a local farmer, 8 prawn was 1 kilo, cost was 120 Baht. 4 people enjoyed this, so about 88 cents per serving.
Family has been making these for many years like this.
Thailand.
Thailand.

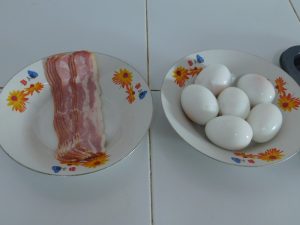
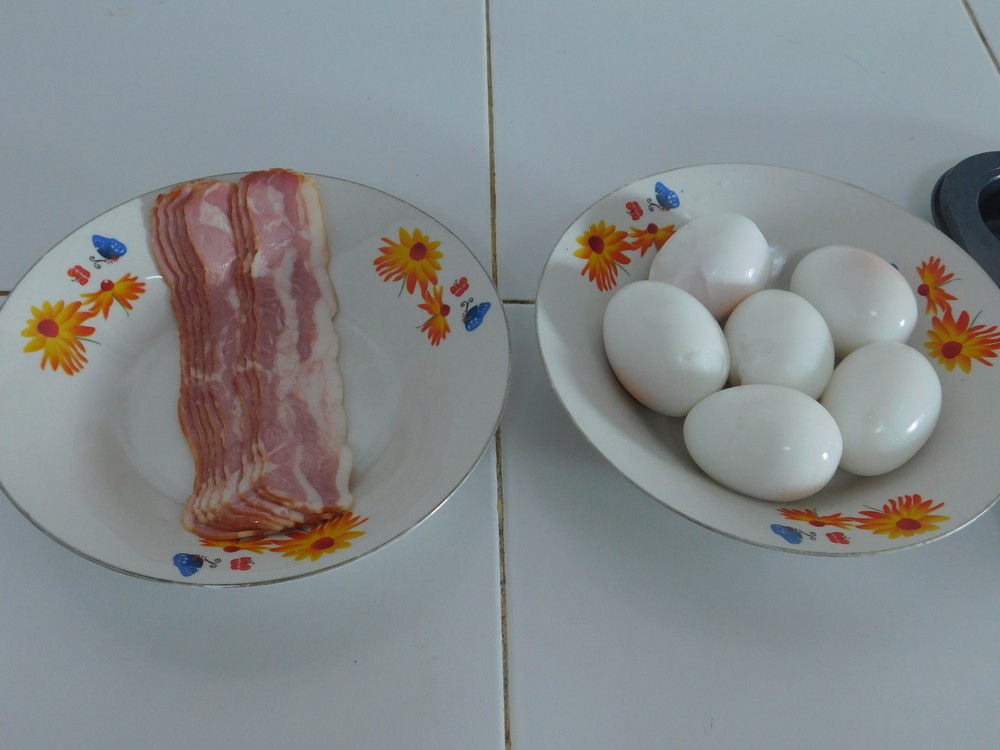
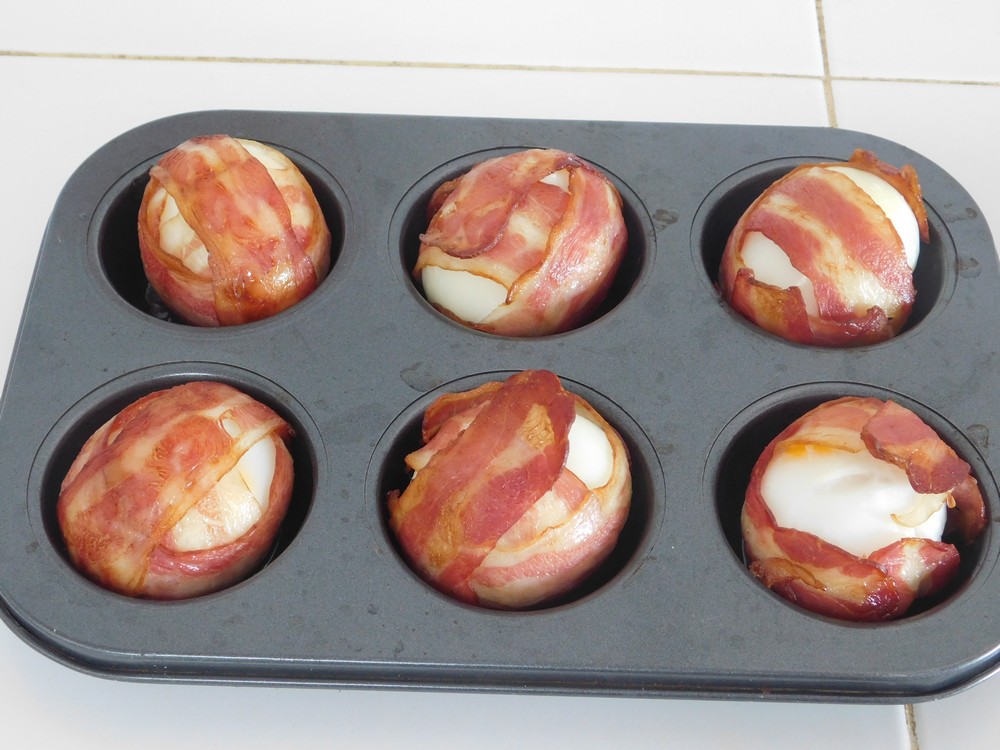
Baked Bacon Eggs
These are incredibly good, a twist on the standard Scotch egg witch is covered with sausage and deep fried. I made these on 19 Nov 2017 very much liked by the family.
Ingredients
- soft boiled eggs, chicken or duck, peeled
- slices bacon, 2-3 slices per egg
Instructions
- Preheat your oven to 200 C (390 F). Get out a muffin pan.
- Set out your bacon and soft boiled eggs, I used duck eggs as those are favorites here. The muffin pan is to the right of the eggs.
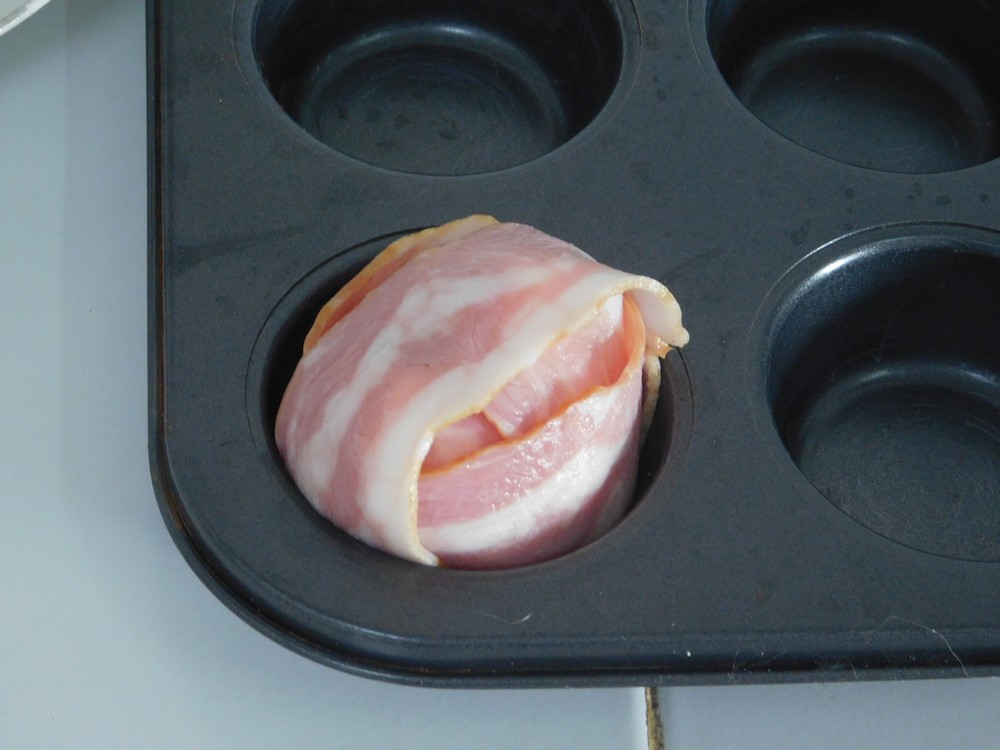
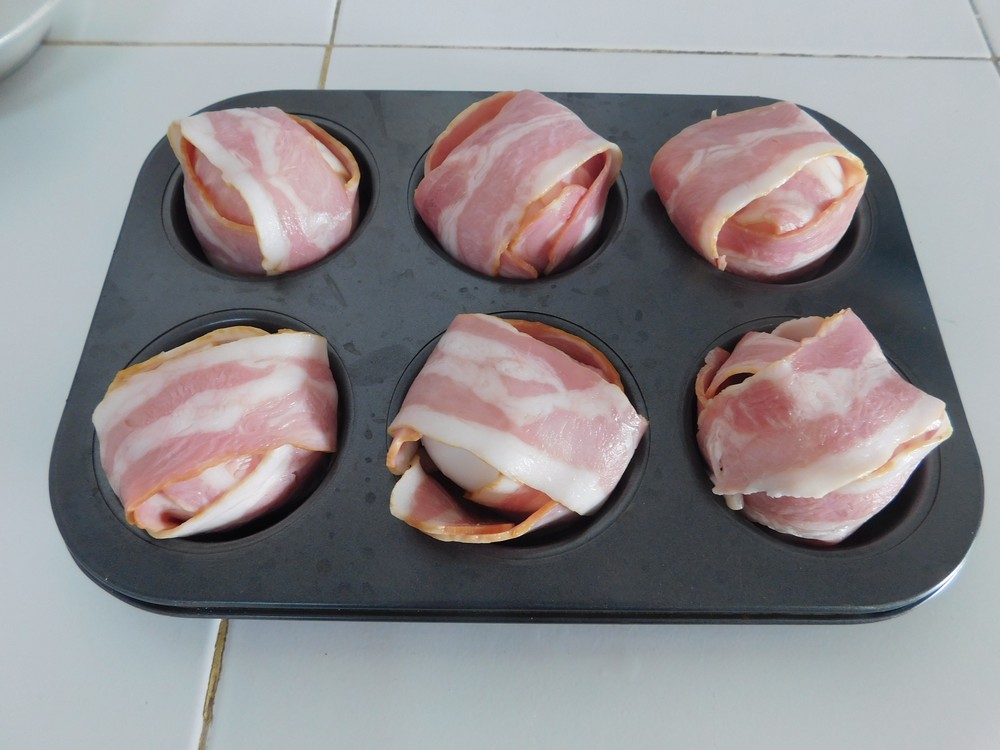
- Wrap an egg with 2-3 slices of bacon, one crosswise, and one to two lengthwise and place in the muffin pan with the edges down in the pan.

- Repeat for the rest of the eggs. Bake for 15 to 20 minutes, then gently turn the eggs to cook the other side, for another 10 to 15 minutes or until the bacon is crispy.

- When you turn them during cooking, some of the bacon will come lose, no worries.

- Serve with buttered toast.

Notes
Low cost overall. Figure 2 eggs and 4-6 slices of bacon per serving.
Adapted from an internet recipe.
