
Archive for the ‘#1 Go-To Recipes’ Category
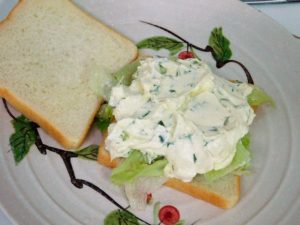
Dill Pickle Cream Cheese Sandwich
This is from a good friend, and it is delicious! I make my own dill pickles, grow dill, and cream cheese is easily available, perfect. Link to the Shortcut is listed in the Recipe Notes section.
Ingredients
- 250 grams Cream cheese, softened, (8 oz)
- 1/3 cup dill pickles, finely diced, (Shortcut)
- 1 tablespoon dill pickle juice
- 1 tablespoon fresh dill, minced
- salt, to taste
- red pepper flakes, as desired
- 4 slices bread
- lettuce leaves, as desired
Instructions
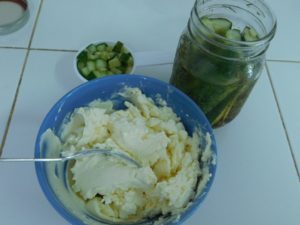
- Add the cream cheese to a mixing bowl, left soften, use a fork to mash to make it nice and soft, clean off the fork with a spoon. Photo shows the cream cheese mashed, my homemade fridge pickles, and 1/3 cup of the pickles chopped. The dill is not in the photo but that is from my yard.
- Use a sturdy spoon and fold in the pickles, juice, and dill until combined, season with salt and red pepper flakes as desired.

- Lay out two slices of bread, places lettuce slices on one slice as desired, spoon cream cheese, generously, on lettuce and spread out, top with remaining slices of bread. Enjoy.


Notes
Caroline Cream cheese is about 120 Baht. For two sandwiches, this is about $1.90 per sandwich.
Shortcut: Fridge Dill Pickles.
Variants: 1. Serve on toast. 2. Use bagels in place of sliced bread.
Recipe provided by good friend, Patti Stone, and her recipe is here.
United States.
United States.

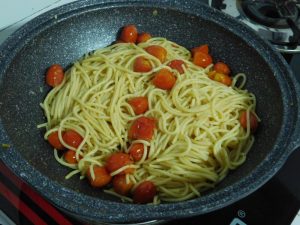
Cherry Tomato Pasta
I made this on 28 May 2018, excellent side dish. Link to the shortcut is listed in the Recipe Notes section.
Ingredients
- 500 grams pasta, type is up to you, (1 lb)
- 1/2 cup butter, 1/2 block, (1 stick)
- 5-6 cloves garlic, smashed and peeled
- 1 pack cherry tomatoes, rinsed
- salt, as desired
- red pepper flakes, as desired
- Parmesan cheese, grated, as desired
- handful bread crumbs, optional, OR make from a shortcut
Instructions
- Heat a large pot of salted water to a boil. Once boiling, add the pasta. The type of pasta is your choice, long like spaghetti, or shorter types.
- While the pasta is cooking, heat a large non stick pan with 2 tablespoons of the butter, when melted and hot, add the smashed garlic. Saute until garlic is softened, smash the garlic as it cooks as well.
- Add the cherry tomatoes into the pan, season with a pinch of salt. Saute to soften the tomatoes.
- When the pasta is almost tender, take a cup of pasta water and add to the pan along with the remaining butter. Stir to melt the butter into the water and mixed into the garlic and tomatoes, crushing some of the tomatoes as you stir. This will make a silky butter sauce.
- Transfer the pasta to the pan using tongs or a pasta fork, or just a large slotted spoon.
- Mix the pasta with the sauce, season with salt and red pepper flakes as desired. Mix in some Parmesan cheese to your liking.
- Optionally, you can add a handful or two of bread crumbs to the pasta and mix that in.
- Serve with additional Parmesan cheese for garnish if desired.


Notes

Shrimp Omelet
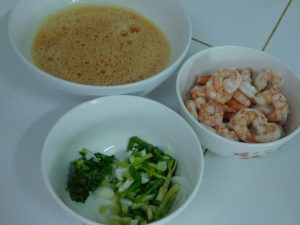
This is basically a Thai style omelet but without any folding, the filling is just mixed into the beaten eggs.
Ingredients
- 4 eggs, beaten
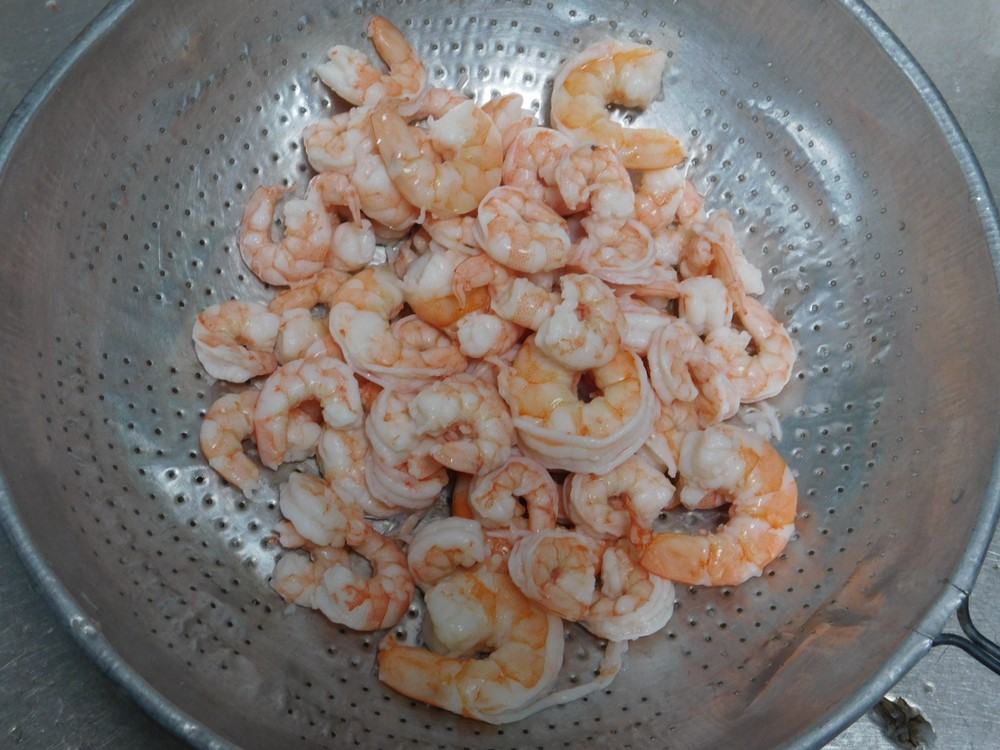
- 1 cup cooked small shrimp, peeled, deveined, tails removed
- 2-3 spring onions, chopped, white and green parts
- 1-2 tablespoons fresh cilantro, chopped
- white pepper powder, as desired
- cooking oil, as needed
Instructions
- For the shrimp, cook them with any method you prefer, such as steaming, boiling, or sauteing. If the shrimp you are using are sort of big, go ahead and chop them into 3/4 inch pieces. For these, I just dropped them into a small pot of boiling water, when they turn pink, drain and drop into cold water to stop the cooking process.

- Crack the eggs into a bowl and beat well, season with white pepper powder as desired. Get everything else chopped, here, everything ready.
- Heat a large non stick pan with a good splash of oil, hot but not smoking.
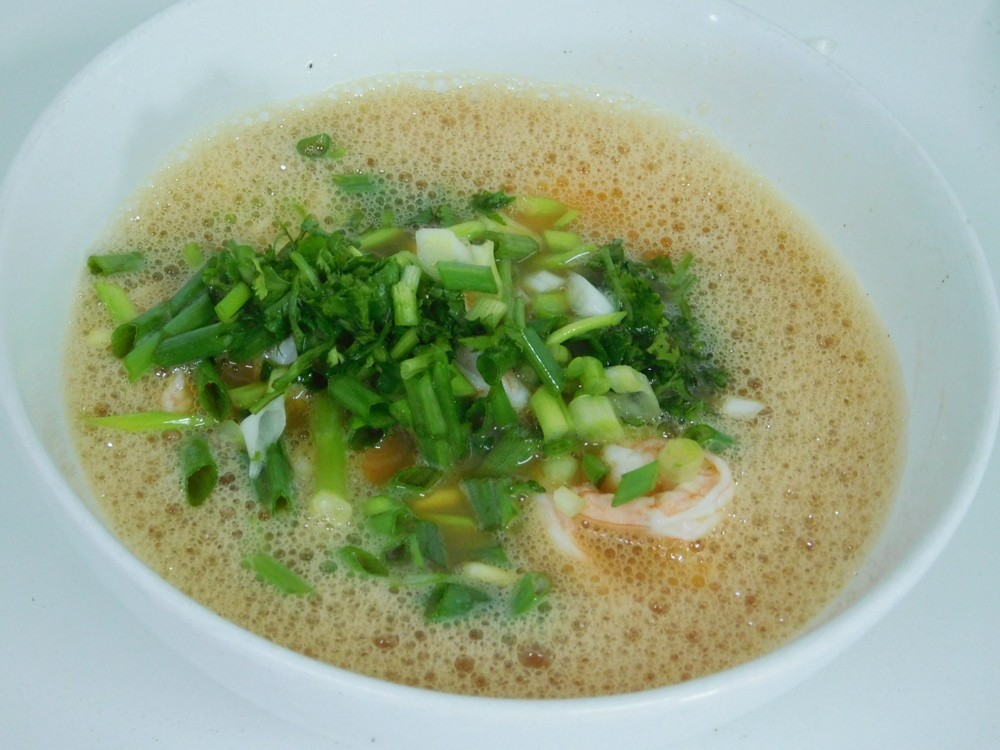
- When the oil is hot, add the shrimp, spring onion, and cilantro into the eggs and mix together.

- Pour the egg mixture all at once into the pan, it will puff as well.

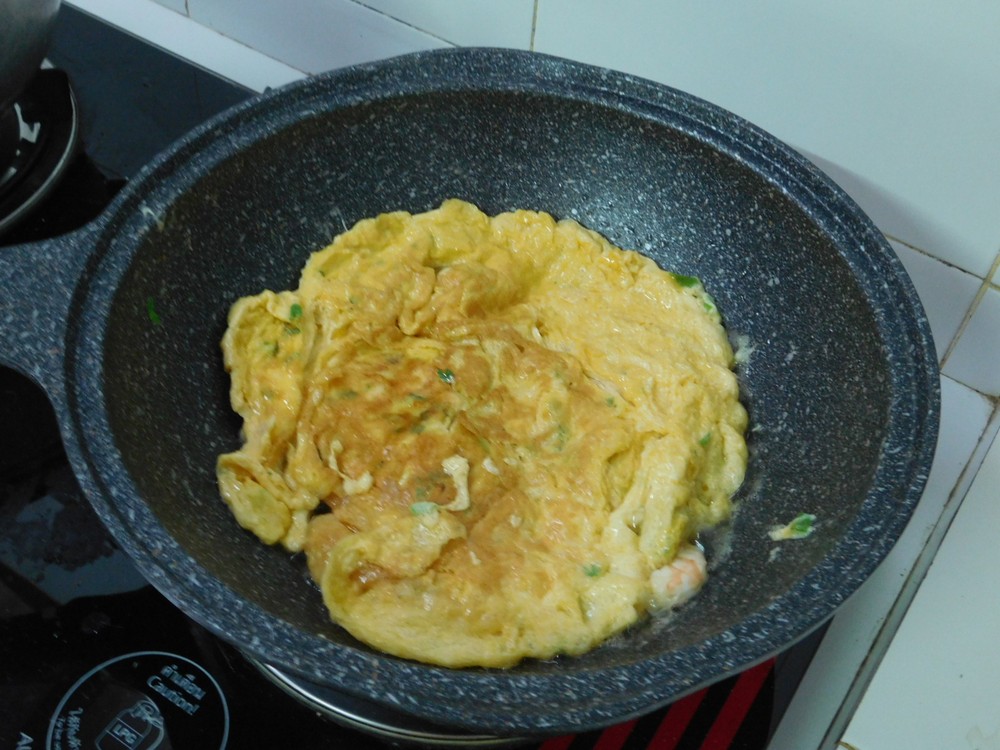
- Use a spatula and lift up the sides to let the egg mixture run onto the hot pan. Cook until the bottom is set and golden brown.

- Flip the omelet over and cook until the bottom is now set.

- Flip one more time and serve. This was my dinner last night, can also serve family style and just place the plate in the center of the table and everyone can dig in.


Notes
Low cost.
Common method to make a Thai Omelet.

Porcupine Meatballs (Slow Cooker)
Feel free to make this with a range of ground meats, such as pork, beef, chicken, or turkey. This sounds really good, and I made this on 17 May 2018, delicious! Link to the shortcut is listed in the Recipe Notes section.
Ingredients
- 500 grams ground meat, pork, beef, chicken, or turkey, (1 lb)
- 1 small brown onion, finely diced, divided
- 1 can condensed tomato soup, OR make from a shortcut
- 1 can water, if using the soup shortcut, 1 1/4 cups
- 1 small carrot, grated
- 2 cloves garlic, smashed and minced
- 1 egg
- 1 tablespoon Worcestershire sauce
- 1/2 cup cooked rice, brown or white
- 2 teaspoons dried oregano, divided
Instructions
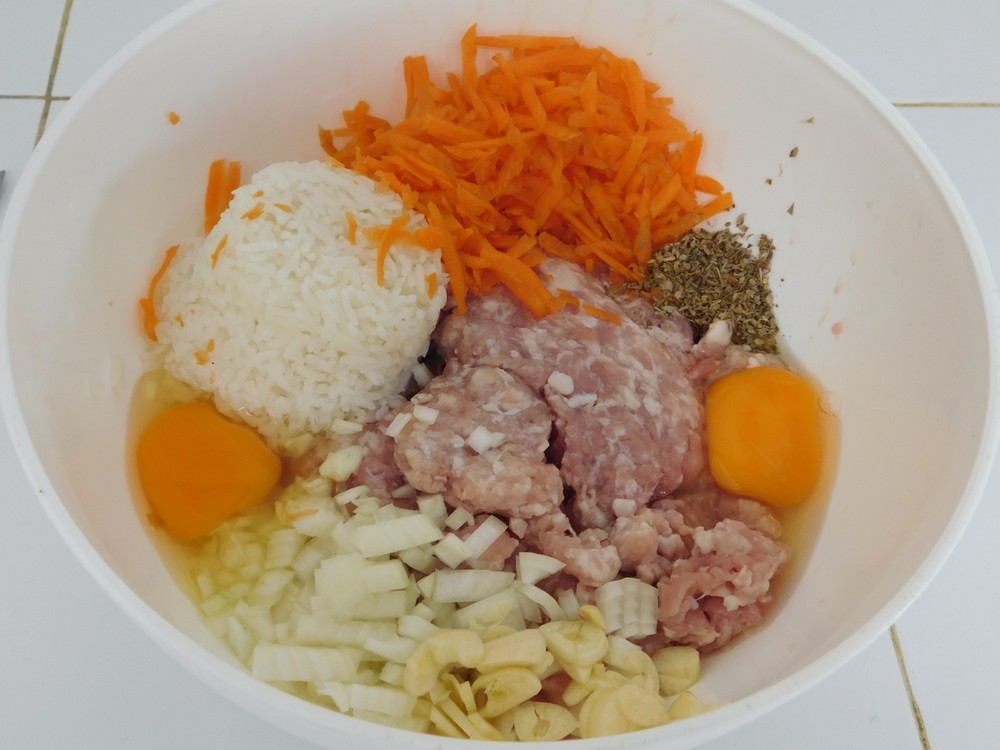
- In a large mixing bowl, add the ground meat, 1/2 the onion, 1/2 the oregano, egg, garlic, carrot, and rice. Then get in there with your clean hands and mix this together. (I used 750 grams of pork (1 1/2 lbs) so I used 2 eggs.)

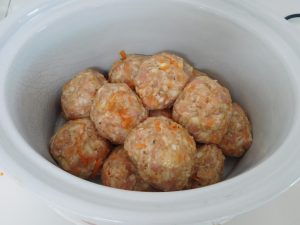
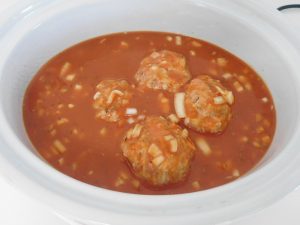
- Shape the mixture into 10 balls and place each in your slow cooker. (I used 750 grams of pork (1 1/2 lbs) so I made 12 good sized meatballs.)
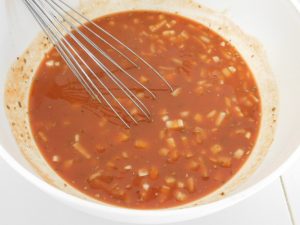
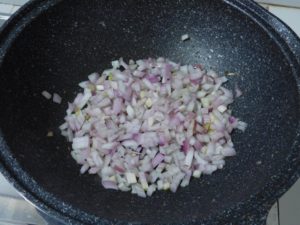
- Wipe out the mixing bowl, then add the soup, Worcestershire sauce, remaining oregano, remaining onion, and the can of water or 1 1/4 cups of water if you made the shortcut. Mix well. (Big change here I used 3 cups of condensed soup.)
- Pour the sauce over the meatballs. Set the slow cooker to High setting and cook for 4 hours then switch to Low setting for 1 more hour.
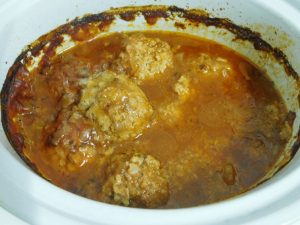
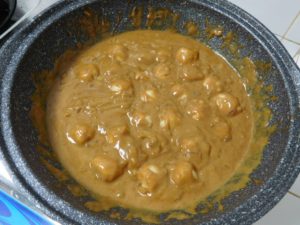
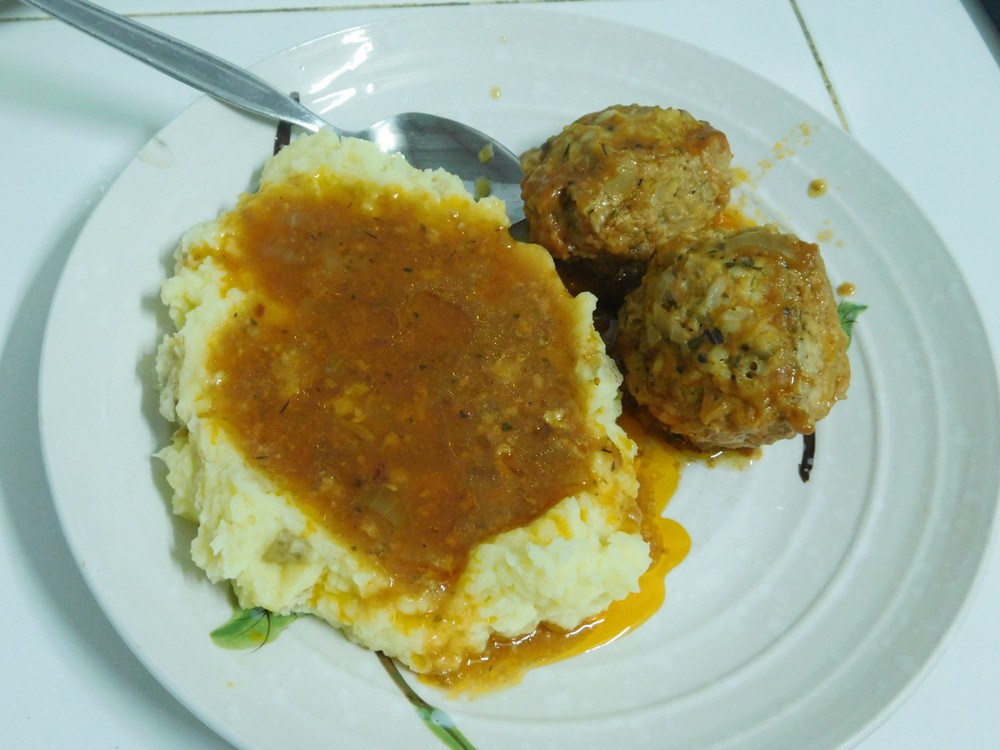
- When ready, use a large spoon to scoop out the meatballs, this photo is with 3 meatballs and 2 scoops of gravy removed already.
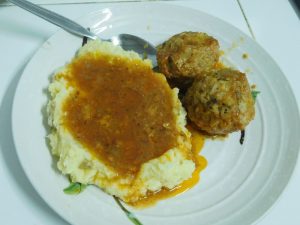
- Serve with mashed potatoes, pasta, or rice. Enjoy.


Notes
Thinking just ground pork or chicken, this is low cost per serving.
Shortcut: Condensed Tomato Soup.
Variant: 1. If you go heavy on the meat, say, 750 grams (1 1/2 lbs) like I did, add another egg, touch more seasoning, and 3 cups of soup.
Adapted from an internet recipe.

Curry Fish Balls
This sounds very good, and uses a packaged curry from Japan that is exceptional in flavor, Japanese curry tastes neither like Thai or Indian curries. Fish balls (think of small meatballs but made from fish) are very common and for folks in the US, these are readily available at most Asian markets. Curried fish balls are very common in China (and I did receive this recipe from a friend in China). This can be a snack or side dish. If I was a betting man, you could increase the number of balls and make a main dish over rice for two people. On my to prepare list.
Ingredients
- 25 fish balls, thawed if frozen, rinsed
- 1 tablespoon cooking oil
- 1 cup red onion, finely diced
- 100 grams Golden Curry, 1 small box or 1/2 a large box
- 1 cup coconut milk, or plain milk if in a pinch
- 1 cup vegetable stock, fresh or from powder, or water
Instructions
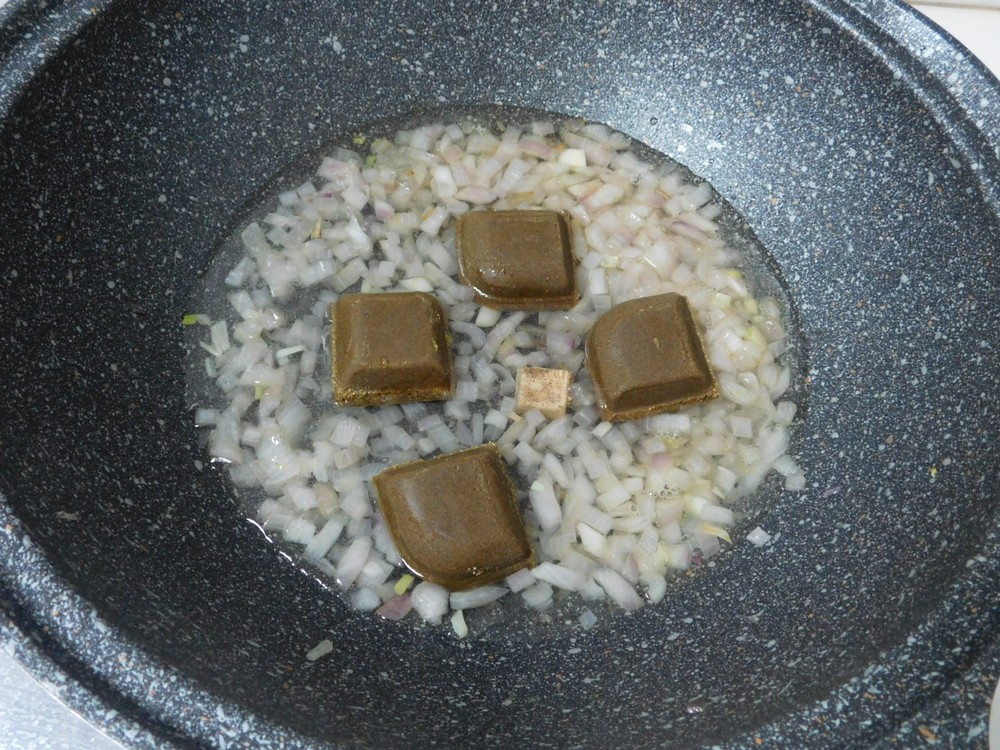
- In a large non stick pan, heat the oil and when hot, saute the onion until soft.
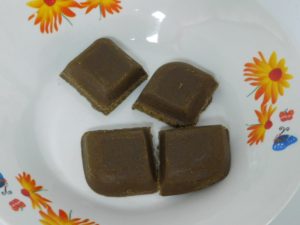
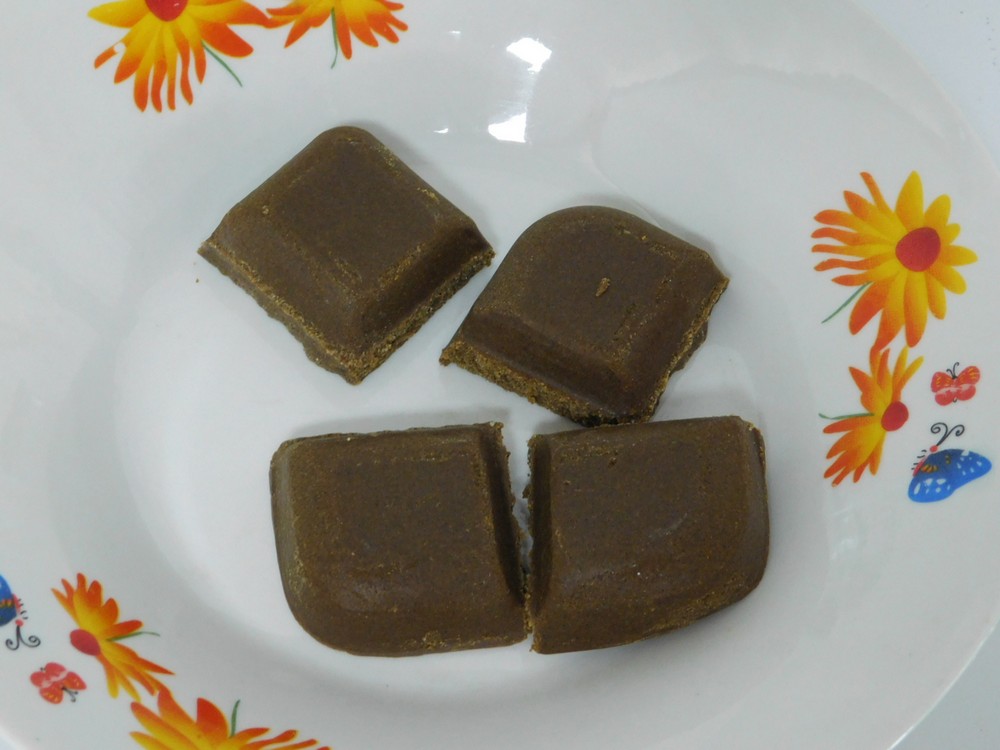
- If you have never used Japanese curry before, it very much looks like a chocolate bar. This melts into hot liquid quickly.
- Pour in the stock and add the curry (yes, it does look like a candy bar). Move the curry around until dissolved and mixed in with the onion and stock.

- Add the coconut milk and stir in, then add the fish balls. Simmer on low heat for about 10 minutes.
- Remove from heat and the curry will thicken.
- Serve as is for a side dish or snack, or over rice with the curry as a main dish. Enjoy.

Notes
Low cost.
Variants: 1. Use mushroom or chicken stock in place of the vegetable broth. 2. Use beef, pork, chicken, or seafood balls in place of the fish balls.
This recipe for Curry Fish Balls is from China Sichuan Food.

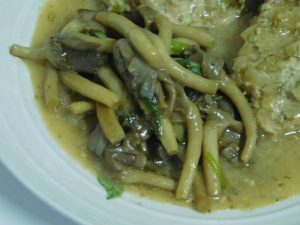
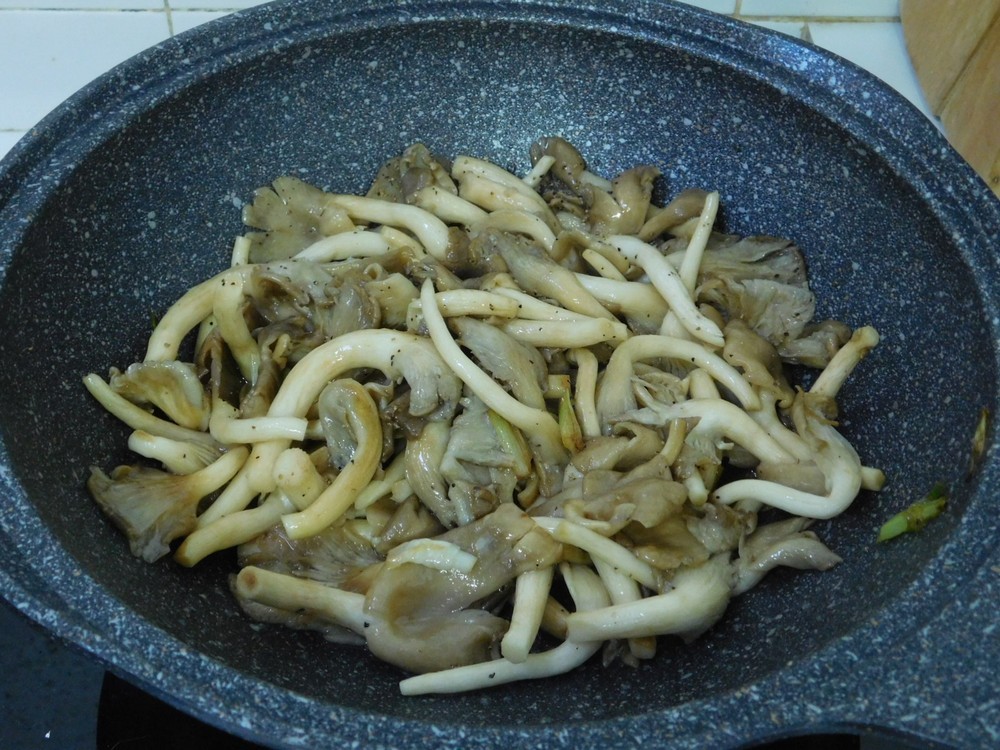
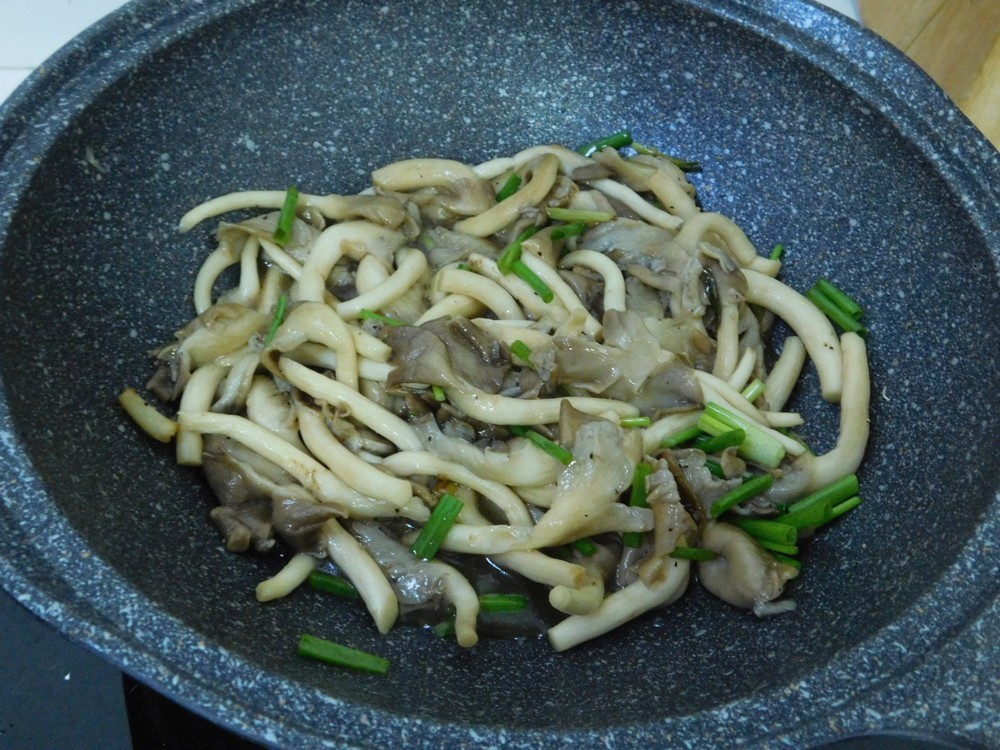
Oyster Mushroom Stir Fry
Oyster mushrooms are excellent cooking mushrooms in Asia, and many restaurants prefer them over the even better Straw mushrooms because they last much longer. Keep in mind, cooking this type of mushroom, the goal is to remove the moisture and just soften the mushrooms. I made this on 13 May 2018, and this is excellent, very well liked by the family.
Ingredients
- 400 grams fresh oyster mushrooms, (14 oz)
- 1 1/2 teaspoons oyster sauce
- 1 teaspoon dark soy sauce
- 1/4 teaspoon ground ginger
- 6 spring onions, cut to 1 inch pieces, white and green separated
- 2 tablespoons cooking oil
- 1/4 teaspoon ground black pepper
- fresh coriander, chopped for garnish
Instructions
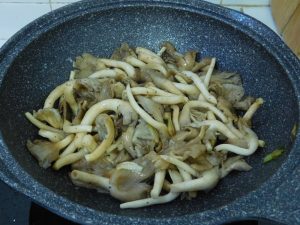
- Cut off the root ends of the mushrooms, wash, shake dry and even gently squeeze out any water. Set aside.
- Heat the oil in a non stick pan on medium heat, when hot, saute the white parts of the spring onion and when softened, sprinkle in the ginger powder.
- Add the mushrooms, oyster sauce, and dark soy sauce. Mix together then let the mushrooms cook with less stirring, think sauteing. This only takes 1-2 minutes. Reduce the liquid in the pan to almost gone.
- Season with black pepper as desired and mix in the green parts of the spring onions, give it a few stirs, then remove to a serving dish. Top with fresh chopped coriander.
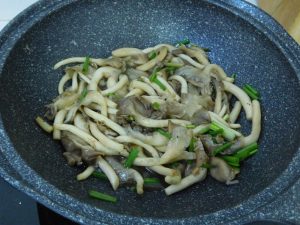
- Serve as a side dish or over rice for a light meal. (For this photo, the liquid you see is chicken gravy, not liquid from the mushrooms, however, I will say the mushrooms with the gravy is very good as well.)
Notes
Low cost.
Variant: 1. For a more authentic flavor, use ground Szechuan pepper. 2. Add shrimp and cook until they turn pink, then serve as a main dish over rice.
This recipe for Oyster Mushroom Stir Fry is from China Sichuan Food.
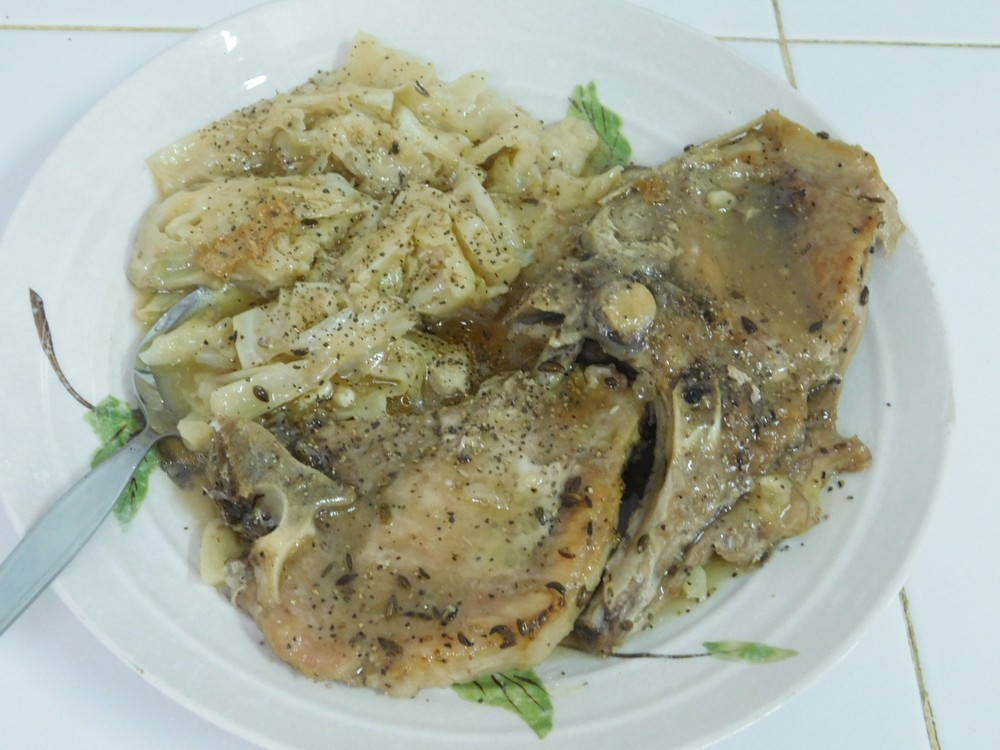
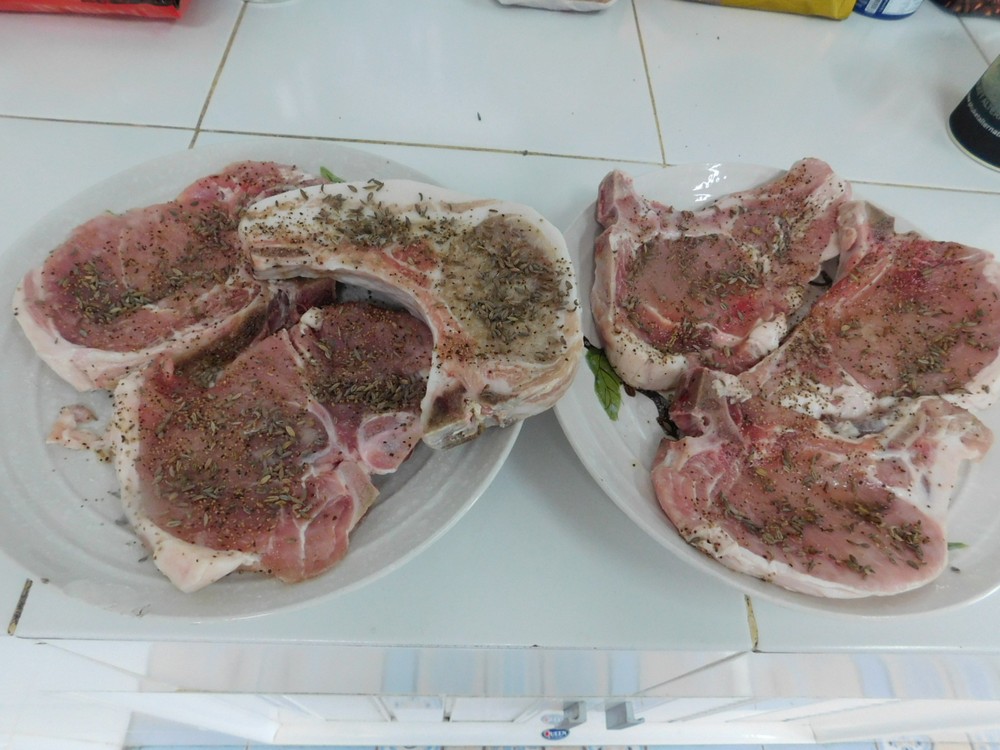
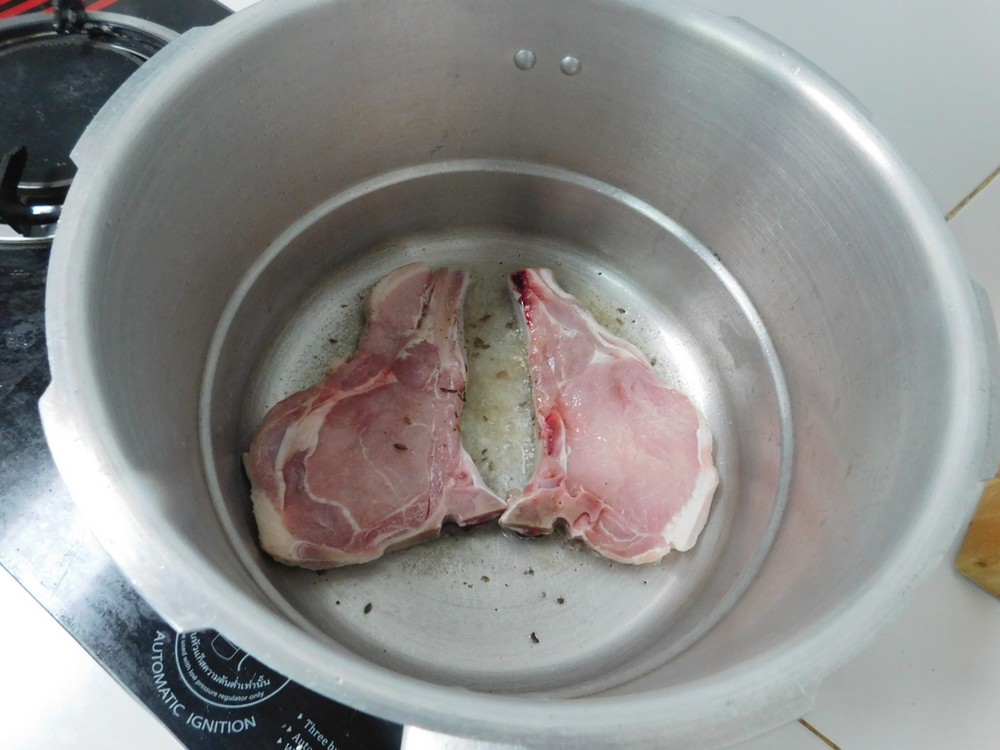
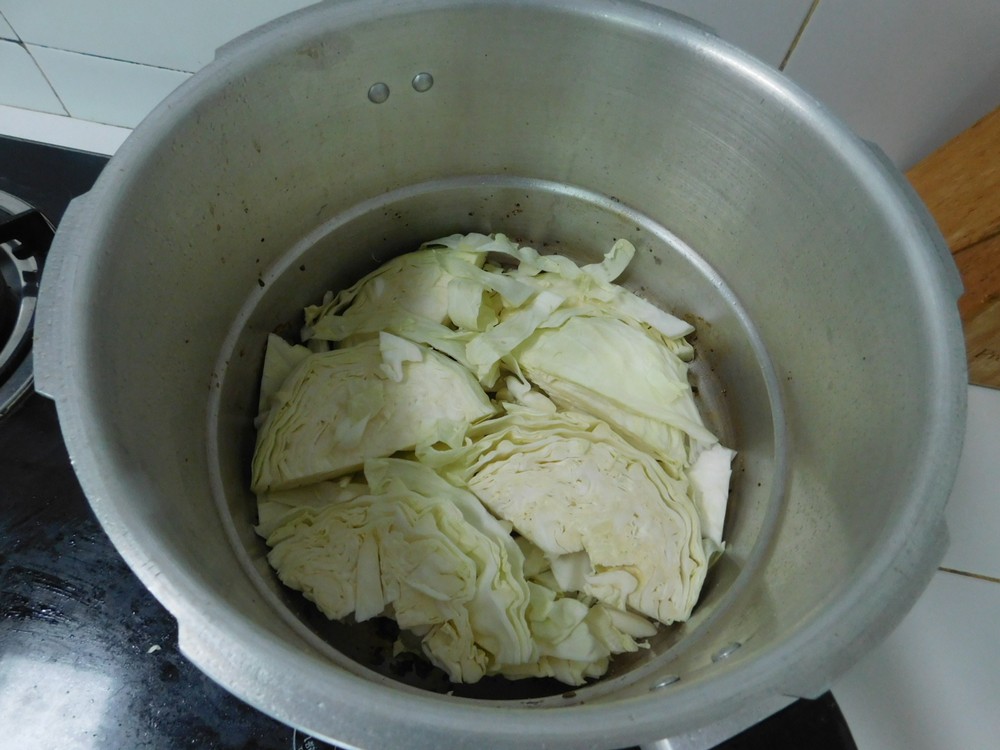
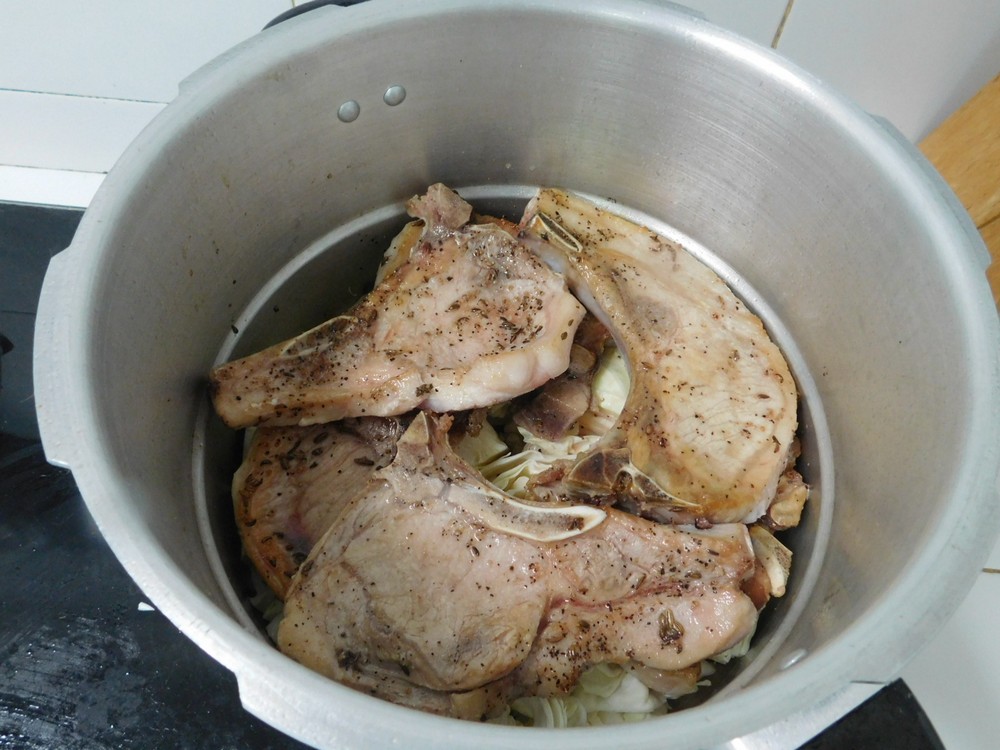
Pork Chops & Cabbage (Pressure Cooker)
As a bonus, the chops and cabbage are cooked at the same time. This is absolutely delicious! The time on full pressure is 100% spot on. I used my large 9 liter (9½ quart) stove top pressure cooker with 80 kPa (12 psi) pressure for this. Follow the safety precautions for your model of pressure cooker.
Equipment
- Pressure Cooker
Ingredients
- 4 thick cut pork chops, ¾ inch thick, bone in
- salt and pepper, as desired
- fennel seeds, as desired
- 1 head small cabbage, about 500 grams, (1 lb)
- 1 tablespoon cooking oil
- ¾ cup chicken stock, fresh or from powder
- 1 tablespoon corn starch
- 1 tablespoon water
Instructions
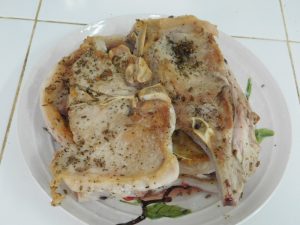
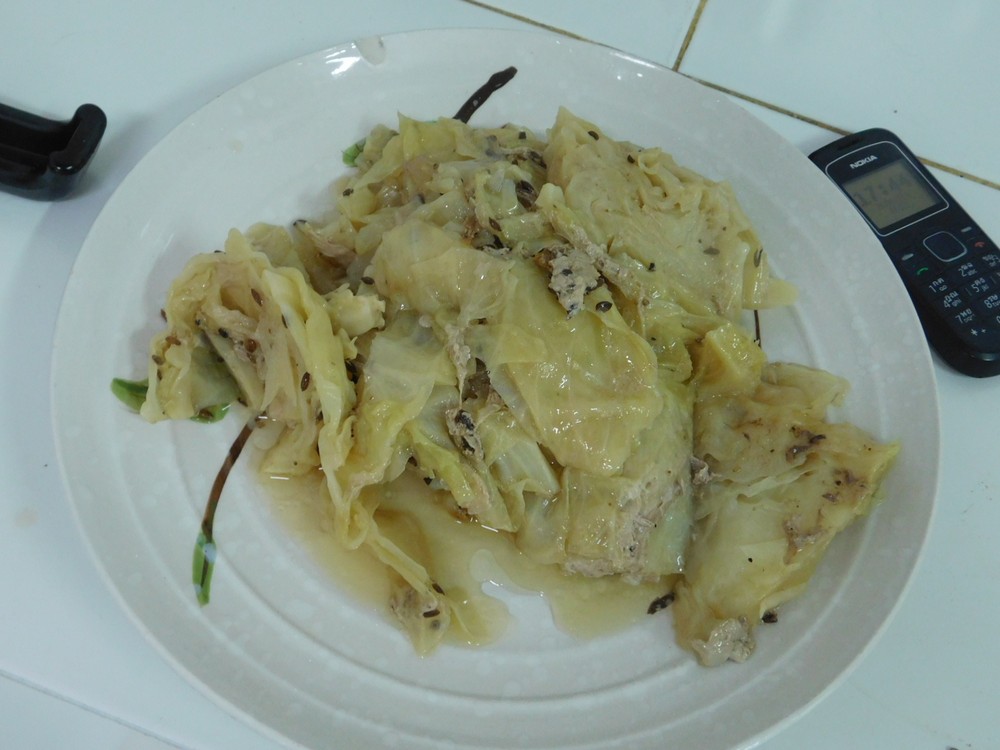
- Season the chops on one side with the salt, pepper, and fennel. Set aside. (I used one Australian pork chop, that is the one that is mostly fat on the right side of the left plate, and 5 Thai pork chops.)

- Slice the cabbage in half from the top down through the core, make two cuts to form a V and remove the core.
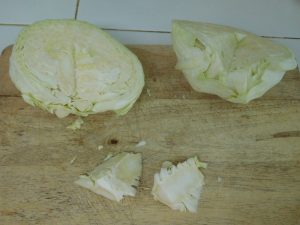
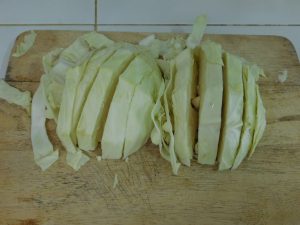
- Lay each piece cut side down and cut into ¾ inch slices and separating some of the leaves. Set these aside.
- Heat the cooking oil in your pressure cooker, without the lid and when hot, brown the chops, two at a time, seasoned side down, until nicely browned. You are only browning the seasoned side.

- Remove chops from the cooker to a plate. Repeat until all the chops are browned.
- Place the cabbage into the cooker

- Then place the chops on top, browned side up, overlapping as needed to get them all into the cooker. Any juices on the plate the chops were on, pour that into the cooker along with the chicken stock.

- Place the lid on the cooker and lock, add the weight (the jiggler), and turn the heat to high.
- When the jiggler starts moving and venting pressure, indicating full pressure, reduce heat to low or medium low to maintain pressure release, and start timing for 6 minutes.
- When 6 minutes have passed, remove from heat and allow a natural release of pressure. Once the cooker is no longer pressurized and safe to open, remove the weight first, then the lid.
- Remove the chops to a serving dish with a large slotted spoon, leaving the liquid in the pot and cover chops with foil.

- Remove the cabbage with the slotted spoon, again, leaving the liquid in the pot.

- Mix together the corn starch and water to make a slurry. With the lid off, bring the cooker to medium high heat and bring the liquid to a boil, whisk the bottom of the pot to loosen and tasty bits then whisk in the slurry, reduce heat and continue whisking until the gravy is thickened to your liking.
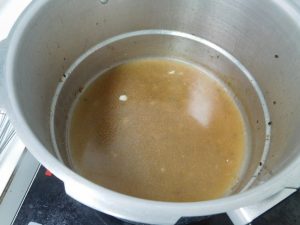
- Pour the gravy over the chops and cabbage, serve and enjoy.


Notes
I will price this next time I go to the city and pick up fresh pork chops at Tesco. For now I will say Fair cost per serving.
Mashed Potatoes (Pressure Cooker)
This will use either the steamer tray or basket that came with your pressure cooker or any steamer basket or trivet that will keep the potatoes above the water. This process cooks the potatoes with pressure and heat, they cannot get waterlogged or soggy like boiled potatoes. Only takes 6 minutes on high pressure and a natural release. Follow the safety precautions for your model of pressure cooker. I made this on 17 May 2018, and this is what mashed potatoes are supposed to taste like! These are outstanding!
Equipment
- Pressure Cooker
Ingredients
- 2-6 potatoes
- 2 cloves garlic, peeled
- 2 cups water
- butter
- milk, as needed
Instructions
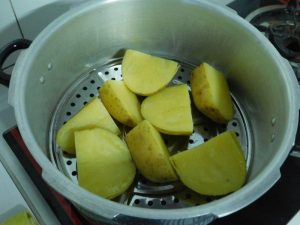
- Wash and scrub your potatoes for unpeeled, or wash and peel, totally your preference. Quarter the potatoes.
- Add the water to your pressure cooker, insert the steamer tray or basket, add the potatoes and garlic to the tray or basket.
- Place the lid on and lock, add the weight (the jiggler), turn on the heat to high. when the jiggler starts to move and vent pressure, indication full pressure, start your timer for 6 minutes and reduce the heat to low or medium low to maintain full pressure.
- When 6 minutes have passed, turn off the heat and move the pressure cooker to an unused burner to cool and release the pressure naturally, about 10-15 minutes.
- When the pressure is fully released, open the lid.
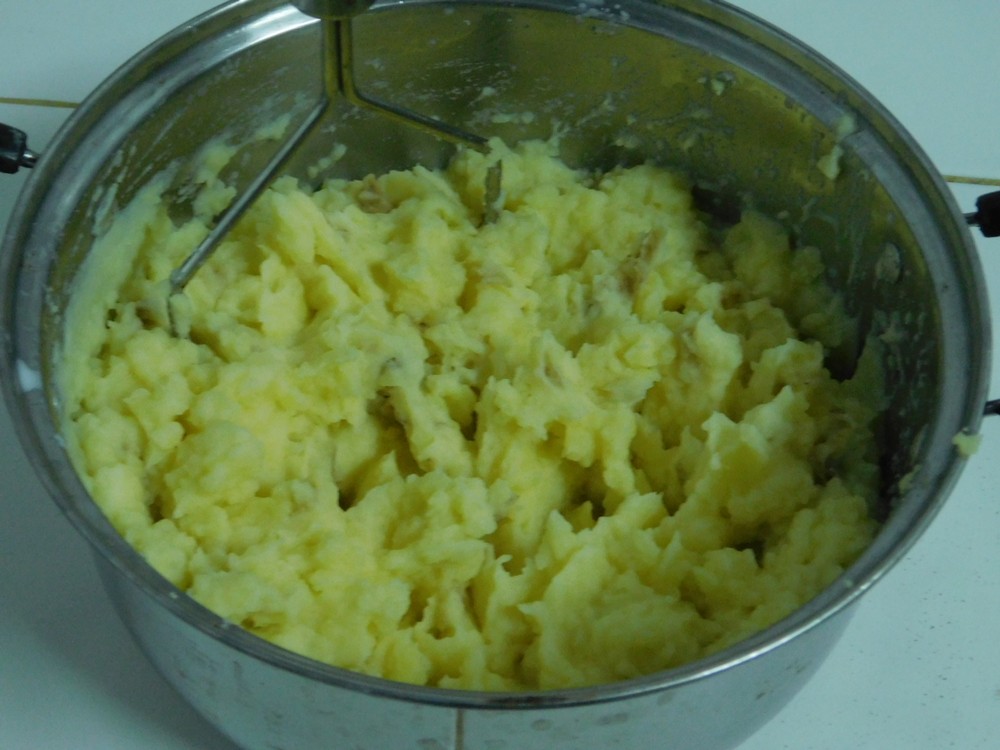
- Transfer the potatoes to a medium sized pot (you can use a sturdy mixing bowl but I feel that a pot is much easier to work with) and using a potato masher, mash up the potatoes. Add a splash of milk and 2-4 tablespoons of butter and mash that in.

- Serve as side dish.


Notes
Low cost, and an energy and time saver as a bonus.
Used in Recipes Listed on this Site:
- Ranch Mashed Potatoes.
- Giant Meatball I.
- Colcannon, made it, GO-TO recipe.
- Ellen's Beef Manhattans.
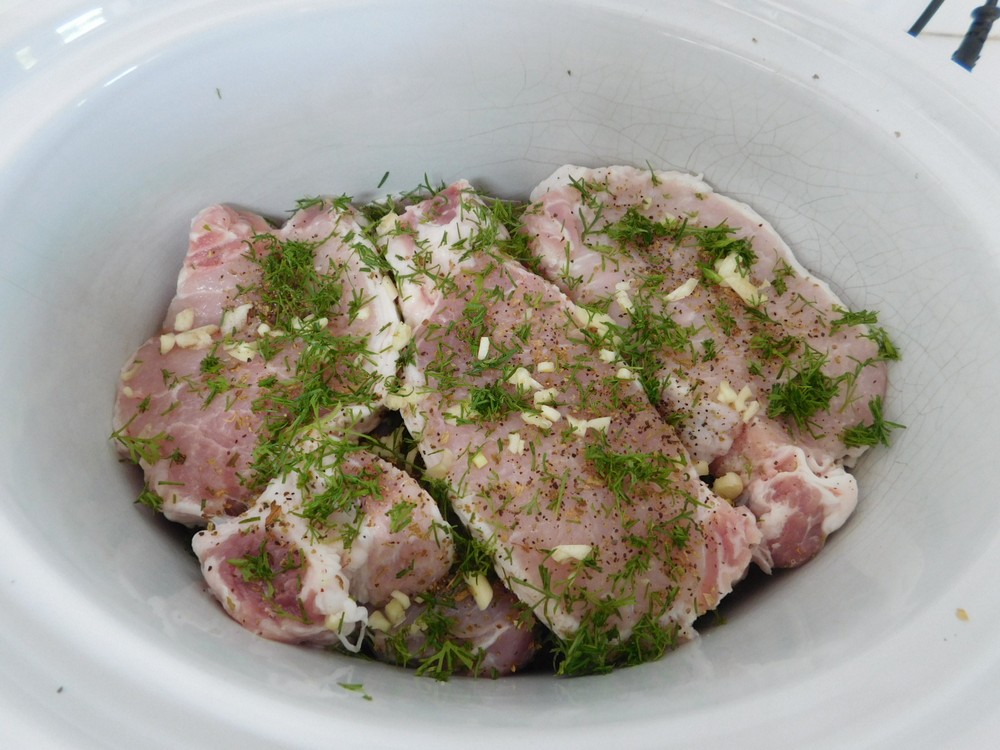
Pork Loin (Slow Cooker)
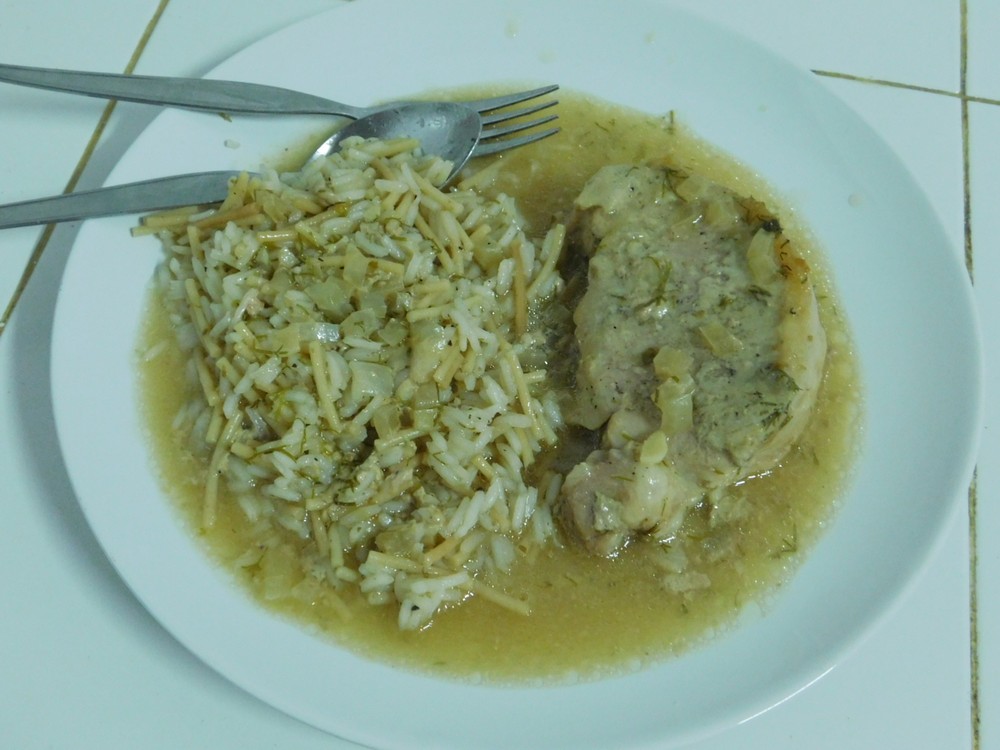
This is a spin off from the 3-Ingredient Crockpot Ranch Pork Chops, which uses a packet, or homemade, Ranch Dressing. Ranch dressing has dried dill, dried parsley, dried diced onion, garlic powder, onion powder, and black pepper (those are the basic ingredients), so in this, I stepped it up to fresh dill, fresh garlic, fresh onion, and used pork loin instead of chops.
Ingredients
- 6 slices pork loin, thick cut
- 1 medium onion, diced
- 3 cloves garlic, smashed and minced
- 1 palmful fresh dill, chopped
- 1 teaspoon dried parsley
- 1/4 teaspoon black pepper
- 2 cups chicken gravy
Instructions
- I am going to use use fresh onion, garlic, and dill, and no added salt.

- Tesco has excellent pork loin, can get 3-4 thick slices from each piece. Here is the 6 pieces I am going to use for this recipe.

- Place the diced onion in the bottom of your slow cooker. Place a layer of pork loin, then sprinkle with half the pepper, parsley, garlic, and dill. Place another layer of pork loin and sprinkle the remaining pepper, parsley, garlic, and dill.

- Prepare your chicken gravy, I use Lobo brand (Thai product which is very good), let the gravy cool for a few minutes, then pour over the pork loin, do worry if the dill sort of floats away in places, it is all cooked together.
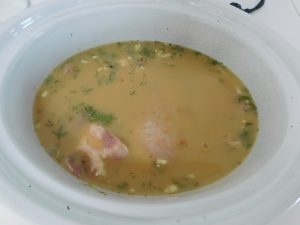
- Set the cooker to Low setting for 6 to 8 hours, cover and cook for 6 hours without removing the cover, then check the tenderness. Time is variable with thickness of the slices. for thin, less than 1 inch check at 6 hours, for 1 inch check at 7 hours, for 1 1/2 inch check at 7 and you may need to cook another hour. If not tender, cook for another hour and check again. Once tender, if not serving right away, just switch the cooker to Warm setting.
- Serve with mashed potatoes, rice, or pasta, and spoon the gravy over everything, add a vegetable for a side and you have a complete meal. Enjoy.


Notes
Pork loin in Tesco will cost about 170 Baht/1 1/2 kilos, for 6 servings, this is about 90 cents per serving.
My own creation based on another recipe to use fresh ingredients and pork loin instead of costlier pork chops. Lee Thayer.
Thailand.
Thailand.
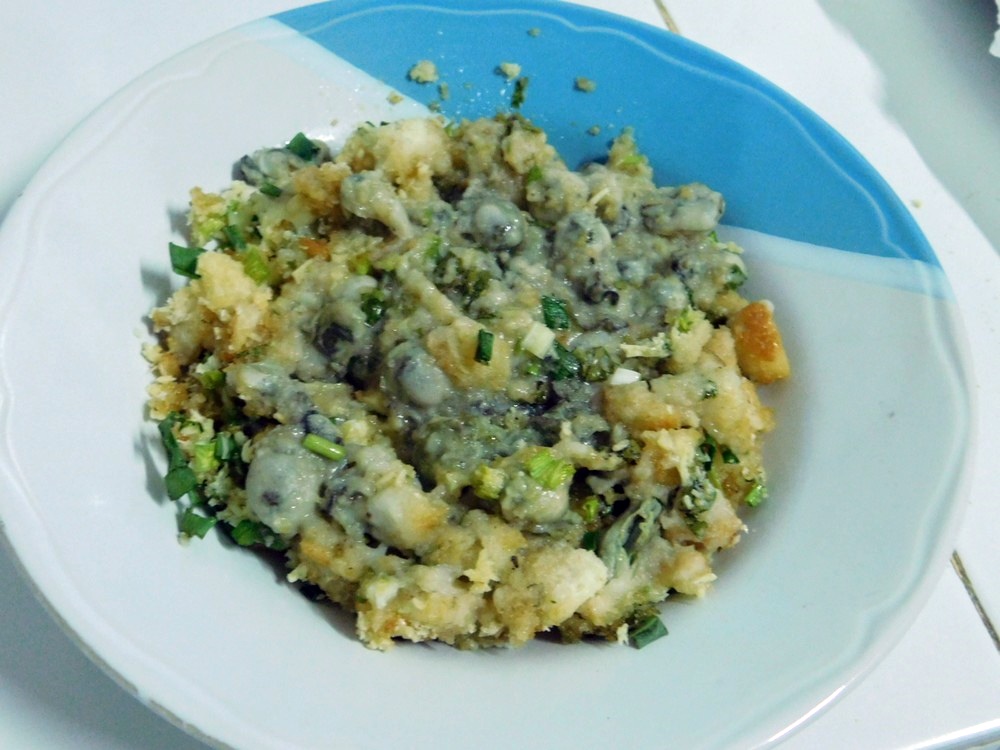
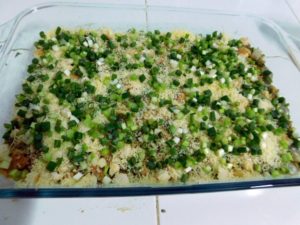
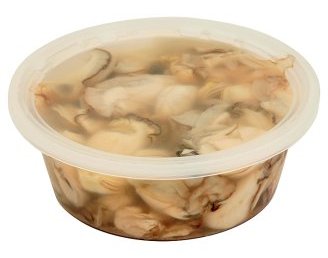
Oyster Casserole
I bought a quart of fresh oyster meat on 3 Jun and decided to make this. This is easy and delicious. Link to the shortcut is listed in the Recipe Notes section.
Ingredients
- 4 cups oyster meat, rinsed and drained well, (2 pints / 1 quart)
- ⅓ cup extra light olive oil
- 2 cloves garlic, smashed and finely minced
- ⅓ cup fresh parsley, chopped
- 2 cups Italian breadcrumbs, Shortcut
- ¼ cup lemon or lime juice
- 6 spring onions, sliced, white and green parts
- ⅓ cup Parmesan cheese, grated
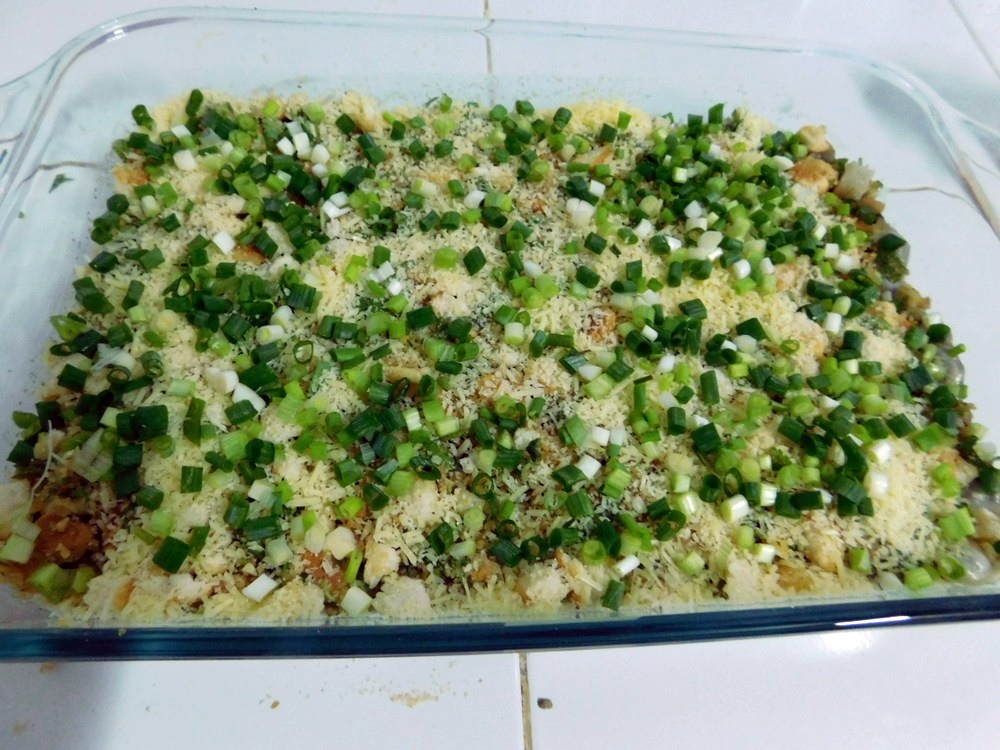
Instructions
- Preheat your oven to 200° C (400° F). Grease a 9x13 baking dish with butter. This is the container that oyster meat comes in at Tesco, I will verify the amount of containers needed when I make this. I think there is 1 cup of oyster meat in a container, and these cost 49 Baht ($1.53) each.
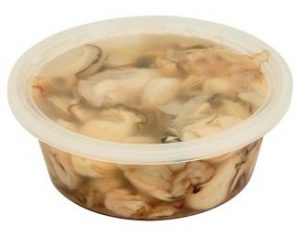
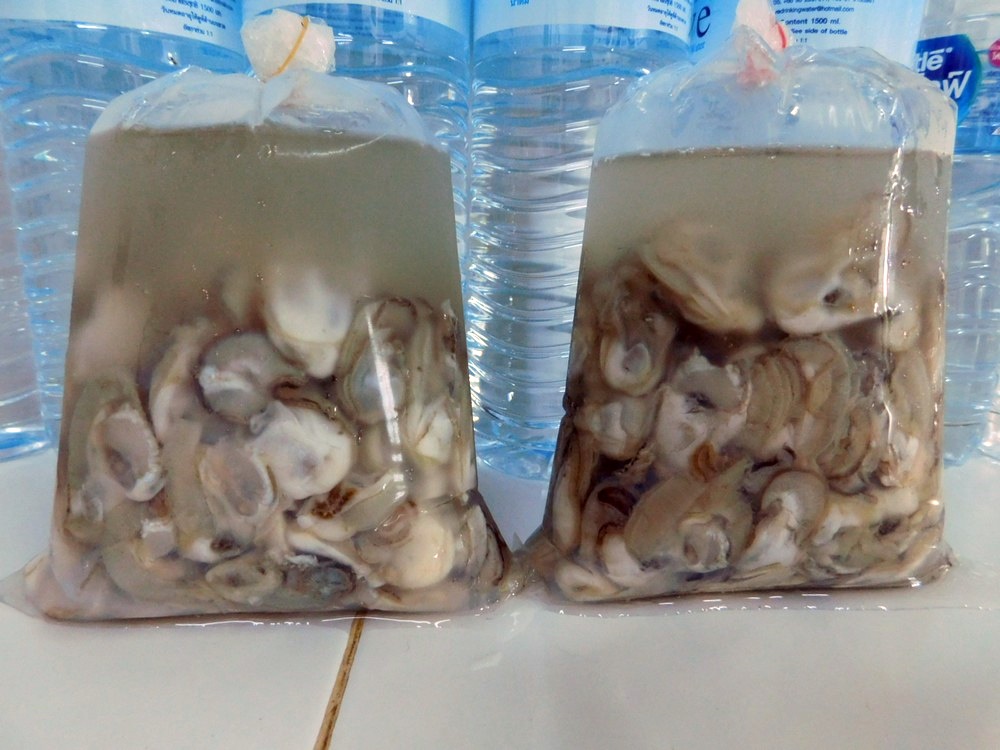
- Here is the oyster meat, in brine, from local fishermen, and they deliver as well. Each bag has 2 cups (1 pint) of oyster meat, drained, these cost 50 Baht ($1.56) each. You can see the savings by buying from a local fisherman, and these are fresh as well.

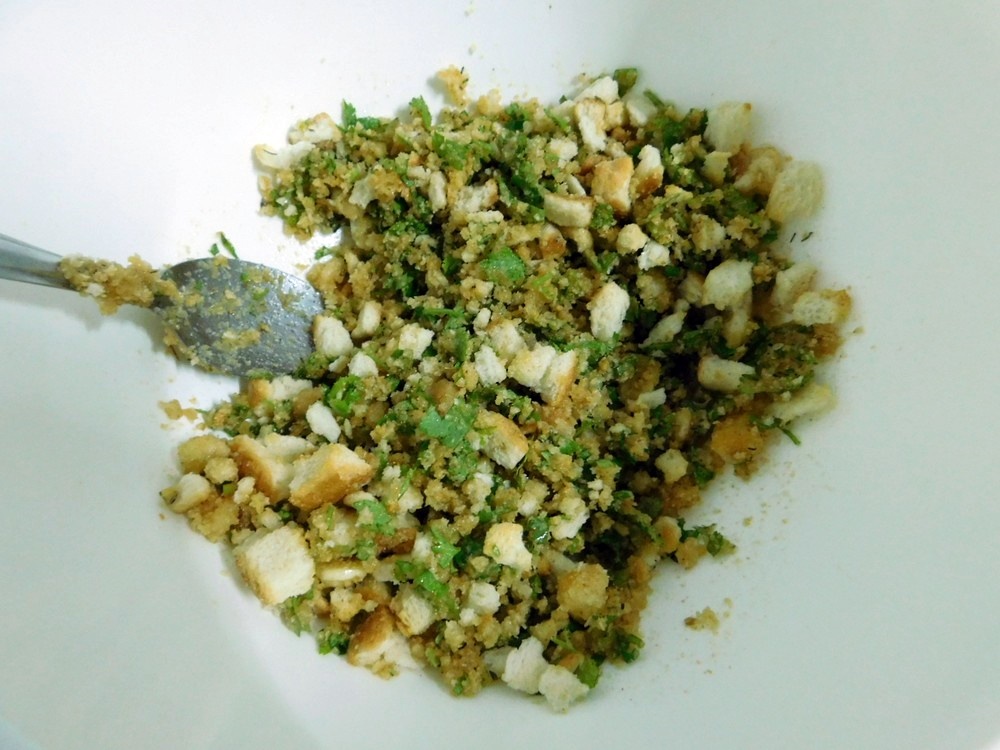
- In a mixing bowl, add the olive oil, garlic, parsley, breadcrumbs, and lime or lemon juice, mix together.

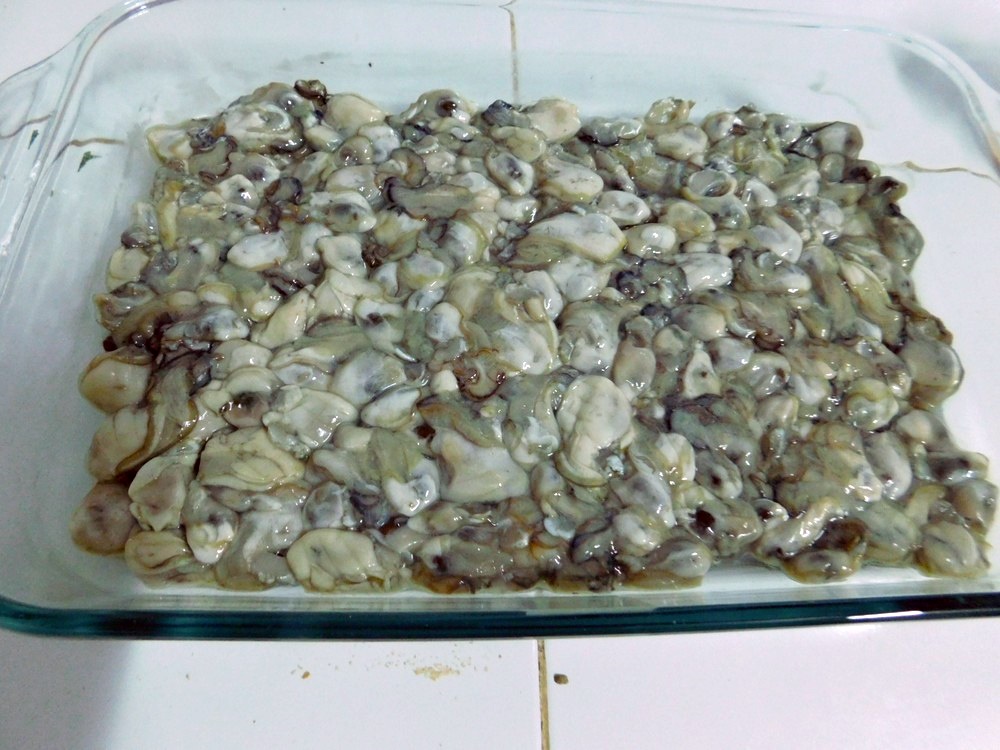
- Add the oysters to the dish and spread out to an even layer.

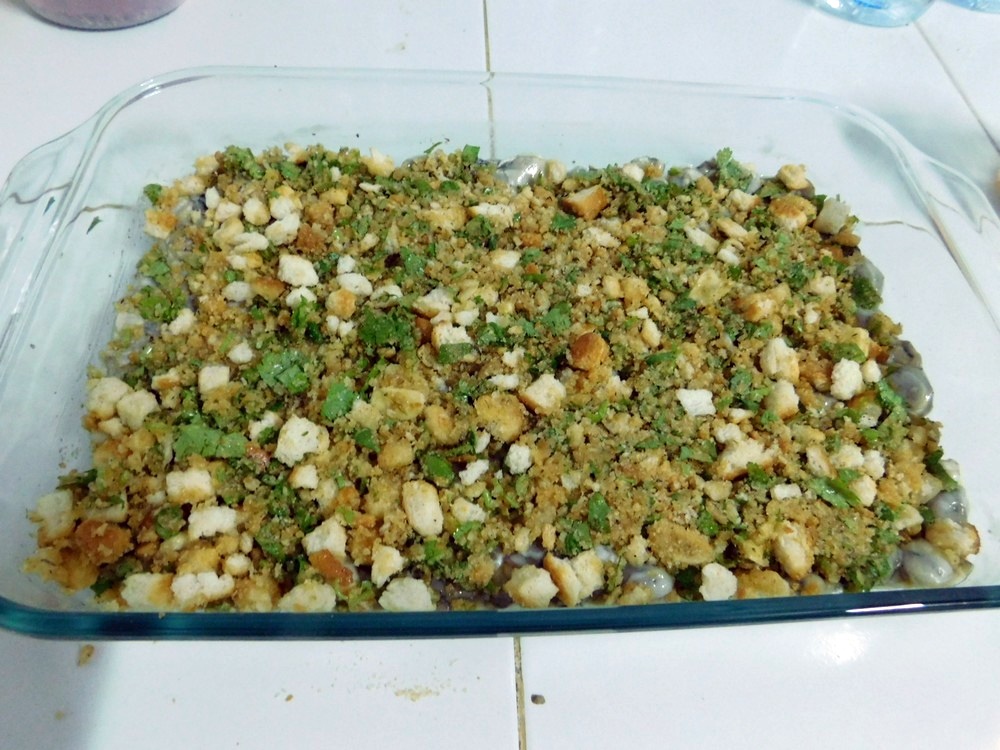
- Spread the breadcrumb mixture evenly over the oysters.
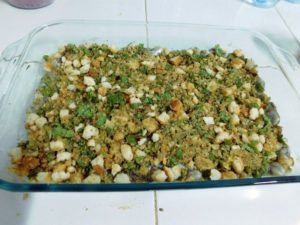
- Sprinkle on the cheese.

- Sprinkle on the spring onion.
- Bake for 25-30 minutes or until the topping browned.

- Serve with a side or two of your choice. Enjoy.


Notes
I used a quart of oyster meat, drained, from a local fisherman, cost was 100 Baht. For 6 servings, this is about 52 cents per serving.
Shortcut: Italian Breadcrumbs.